Quantcast
Channel: Infragistics Community
Viewing all 2374 articles
Browse latest View live

Manually interaction of the input controls position using Touch Keyboard

$
0
0

Let me start a series of articles connected with issues we have faced working with the WinRT platform.

The latest issue I come across is related with the touch keyboard when the input controls are positioned in a Selector based class control. Imagine our XamGrid in edit mode – when we touch some input control to edit its content, we would like the touch keyboard to display and move the components behind it upward, so the editing input becomes visible and when the keyboard hides, the content to be moved back as it was. All this happens by default when the grid is in any other control except a Selector based one – ListBox, FlipView etc. Our WinRT samples browser uses flip view to display the control’s samples, so we are forced to manually control the content movement when invoking the touch keyboard. Here this sample gives а solution. All you should do is get the InputPaneHelper.cs class and simulate what’s done in KeyboardPage.xaml.cs file for your specific case. In our samples browser we add the showing event to the flip view control and access the focused element to calculate the correct displacement of the content as demonstrated in the code below. All other calculations are the same as in the sample.

inputPaneHelper = new InputPaneHelper();

inputPaneHelper.SubscribeToKeyboard(true);

inputPaneHelper.AddShowingHandler(flipView, new InputPaneShowingHandler(CustomKeyboardHandler));

inputPaneHelper.SetHidingHandler(new InputPaneHidingHandler(InputPaneHiding));

.....

private void CustomKeyboardHandler(object sender, InputPaneVisibilityEventArgs e)

{

    object focusedElobj = FocusManager.GetFocusedElement(); Debug.WriteLine(focusedElobj);

    UIElement focusedEl = focusedElobj as UIElement;

    double dis = 0;

    if (focusedEl != null)

    {

        dis = focusedEl.DesiredSize.Height + focusedEl.TransformToVisual(LayoutGrid).GetMatrix().OffsetY;

    }

    if (dis > e.OccludedRect.Height)

    {

        displacement = dis != 0 ? e.OccludedRect.Height - dis : -e.OccludedRect.Height;               

        e.EnsuredFocusedElementInView = true;

        ShowingMoveSpline.Value = displacement;

        MoveMiddleOnShowing.Begin();

    }

}

 So, have in mind that when you have an input control in a selector class, you should manually control the displacement of the elements using a touch keyboard.


A Sneak Peek at Internet Explorer 11

$
0
0

Microsoft recently made an official announcement about Windows Blue, officially and formally renaming the product as Windows 8.1. This announcement also included what is basically a minor service pack update. It will be made available free of charge, and is set for release ‘late in 2013’.

One of the more interesting features included in leaked betas of ‘Blue’ is Internet Explorer 11. However, it is still early days, and we don’t know for sure if IE11 will be included in the final release of Windows 8.1. Here is the lowdown on what we do know:

IE11 is Hiding Out on the Web as Firefox

Well… almost. The build most people have seen identifies itself to websites (via its user agent string) as ‘Mozilla.. like Gecko’. Speculation reasons that IE11 might be trying to start fresh, and that by telling websites to treat it as Firefox, it can avoid legacy CSS code written to deal with the various non-standard ‘features’ of its previous incarnations (IE 6, 7, and 8). It’s a bit sneaky, but entirely legitimate way of cutting ties with the past. Blackberry actually followed a very similar trajectory with their latest mobile browser.

Improvements to IE11 ‘Metro’

The ability to save tabs was not previously available in the ‘Metro’ version of IE. This feature will now work across the board (Metro and desktop) in version 11. Metro IE11 will also support a full download manager (which annoyingly takes you back into Windows proper, but that is an operating system thing), which is a huge plus. Additionally, the ever useful developer tools should also find their way into the new version of Metro IE.

Touch Support for the Desktop

The desktop version of IE11 now sports touch navigation controls, bringing it into line with the Metro version.

WebGL Support

WebGL is a JavaScript graphics API that can be used to render 2D and 3D graphics within a web browser. IE11 seems to be receiving native support for the standard, which will bring it up to speed with most of the other major browsers. Chrome had support from version 9, which was released way back in 2011.

What’s Happening at This Year's TechEd?

$
0
0

There are few conferences in the Microsoft developer calendar that are bigger than TechED, and this year’s event is fast approaching. For 2013, there are actually two conferences; one based in the US (New Orleans, Louisiana, June 3-6) and another in Europe (Madrid, Spain, June 25-28).

If you can’t attend either one of the shows, then you should definitely keep an eye on the Channel9 blog for news and updates from the shows.

Both TechEd North America and TechEd Europe feature a packed schedule, which has just about everything geared towards the technical user - developers, architects, systems people, and others. You can look at the conference websites for exact details on all of the sessions and presentations (there is way too much to detail include in this blog post - which is a great sign!), but here are a few highlights:

Hands-on Labs

Both shows feature a large number of hands-on labs. These are great ways to brush up on your technical and power user skills. This year’s labs include:

  • Creating a PerformancePoint Services Dashboard based on a Microsoft SQL Server 2012 BI Semantic Model
  • Implementing Transparent Database Encryption
  • Introduction to Windows Powershell with Microsoft SharePoint Server 2013

Partner Demos and Solutions Experience

Another great component of the two shows is that they both feature dedicated partner demos and ‘experience’ sessions. This is a great chance to see what the third party channel partner network is up to. If you have an interest in third party dev tools, SharePoint add-ons, or Azure utilities - then this is the place to be. It is a good chance to actually talk to the people behind the products, rather than just read their websites.

The Socials

Social events are also present in both TechEd Europe and TechEd North America, occurring on Tuesday evening in the US and Wednesday in Europe. These are more relaxing than typical sessions and are intended to help attendees unwind at the end of the day. If you’re looking for a great way to socialize in a bit more informal setting this is your venue, and Microsoft generally knows how to put on a great show.

Networking

One of the great things about shows like this is the sheer number of people to meet, talk to, and connect with. If it is your first time, you might find it a little overwhelming, but TechEd is a great place to make useful connections. Take some business cards, plan ahead (check here for the North America schedule builder and the European version - you’ll want to sort out upfront the sessions you want to attend), and if nothing else, you will meet some really great people.

Visit Infragistics at TechEd North America!

Don’t forget that Infragistics will be out in full force at TechEd North America! Even though I won’t be there, we’ve got tons of great new demos to show you, some awesome Acers to give away, and of course, we’re in the running for Attendees’ Pick in the Best of TechEd awards (make sure you vote for us!). For more information about our TechEd presence this year, check out this DevToolsGuy blog.

Wrapping It Up

As always, both TechEd shows promise to be exceptional places to check out the latest and greatest in Microsoft and Microsoft compatible technologies. If you’re looking to be at the cutting edge, don’t miss TechEd this year!

Creating Windows Phone Applications with Ignite UI Mobile Controls and PhoneGap

$
0
0

Developers often look for solutions that use the same components for different platforms - WEB, mobile applications ( Windows Phone, Android, iOS ), Windows Store applications etc. This article offers a practical example of how it can be used with one of the most popular packages for WEB client components - Ignite UI and the most popular platform for hybrid mobile applications - Apache Cordova / PhoneGap

On April, 30 2013 was released PhoneGap 2.7.0.  You could download the latest PhoneGap 2.7x -http://phonegap.com/download or http://cordova.apache.org/ or   PhoneGap project from the Github : https://github.com/phonegap. Samples in this article will use this version of Apache Cordova. PhoneGap updates for iOS could be found here. Cordova 2.7.0 updates for Android are available in this article.


With Ignite UI, developers can create browser based, touch-enabled tablet, mobile & desktop experiences.  Ignite UI is a set of advanced HTML & JavaScript user interface controls based on jQuery Core, jQuery UI and jQuery Mobile JavaScript libraries. Ignite UI includes a complete set of Mobile controls with adaptive CSS, so you are covered when building your iPhone, Android & Windows Phone applications. The latest version – Ignite UI 13.1 was released on April 18, 2013
 

First, let's see what it takes to create our WP 8 hybrid application with PhoneGap and Ignite UI


Requirements

Windows Phone 8 brings with it some new requirements.

  • Operating System:

    • Windows 8, Windows 8 Pro
  • Hardware:

    • 6.5 GB of free hard disk space
    • 4 GB RAM
    • 64-bit (x64) CPU
  • Windows Phone 8 Emulator:

    • Windows 8 Pro edition or greater
    • Requires a processor that supports Second Level Address Translation (SLAT)
  • SDK + IDE ( Visual Studio )

    • VS Express for Windows Phone ( included in the SDK )
    • Visual Studio Professional, Premium, or Ultimate
  • Infragistics Ignite UI
    • You can download Ignite UI controls here:


Create Windows Phone 8 Cordova template for Visual Studio 2012


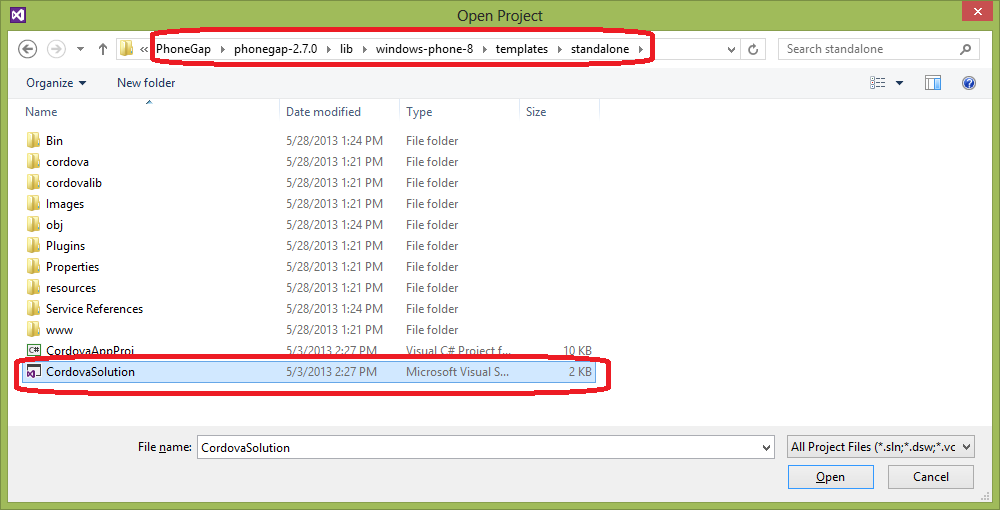
Open PhoneGap folders and navigate to Windows Phone 8 standalone template folder.


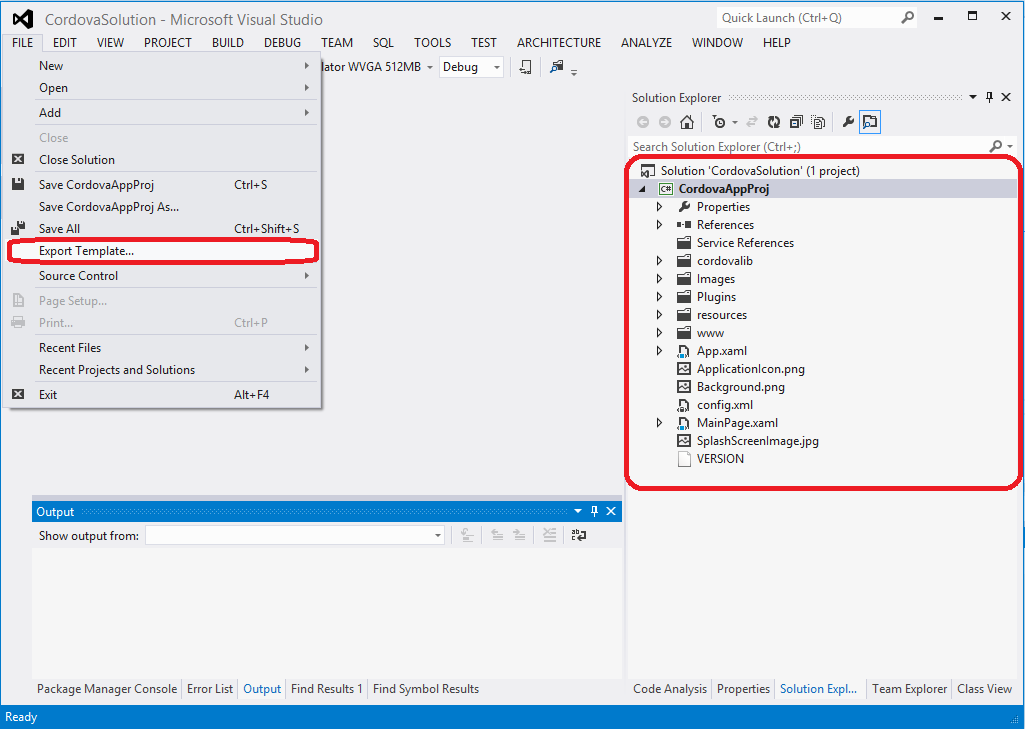
Open the CordovaSolution project and select File->Export Template


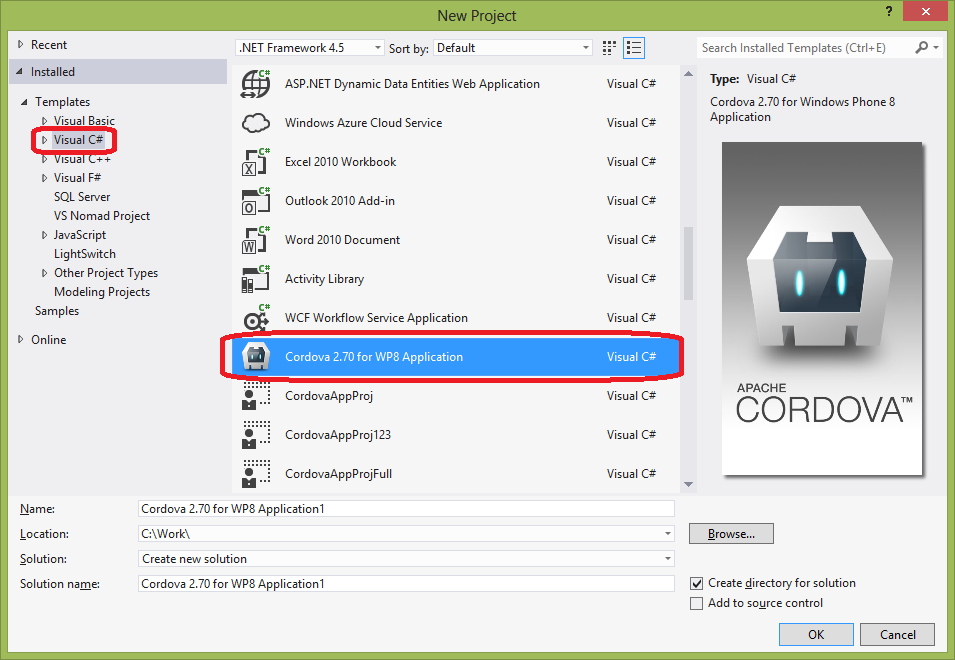
Restart Visual Studio and select File-> New-> Project then Visual C#-> [Cordova for WP8 Application]. The name should be the same like that you wrote when did the template export.


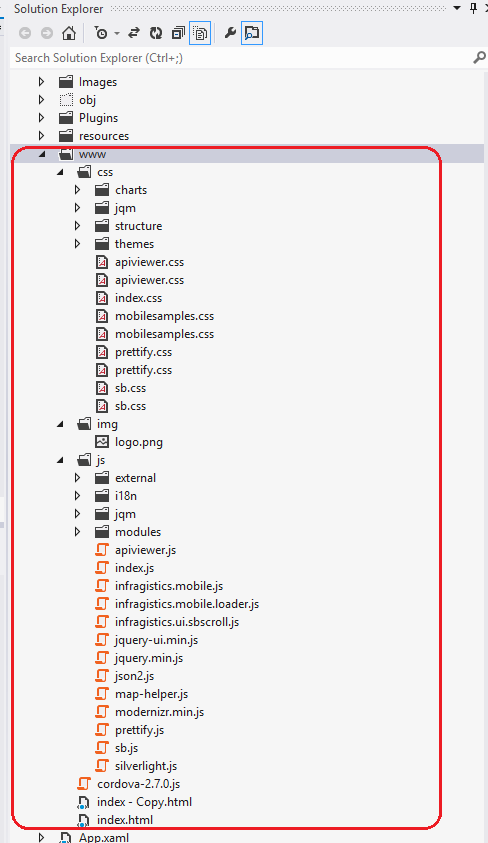
When you create a new Cordova for WP 8 Application you need to update files under www folder.


Update PhoneGap application to support Ignite UI

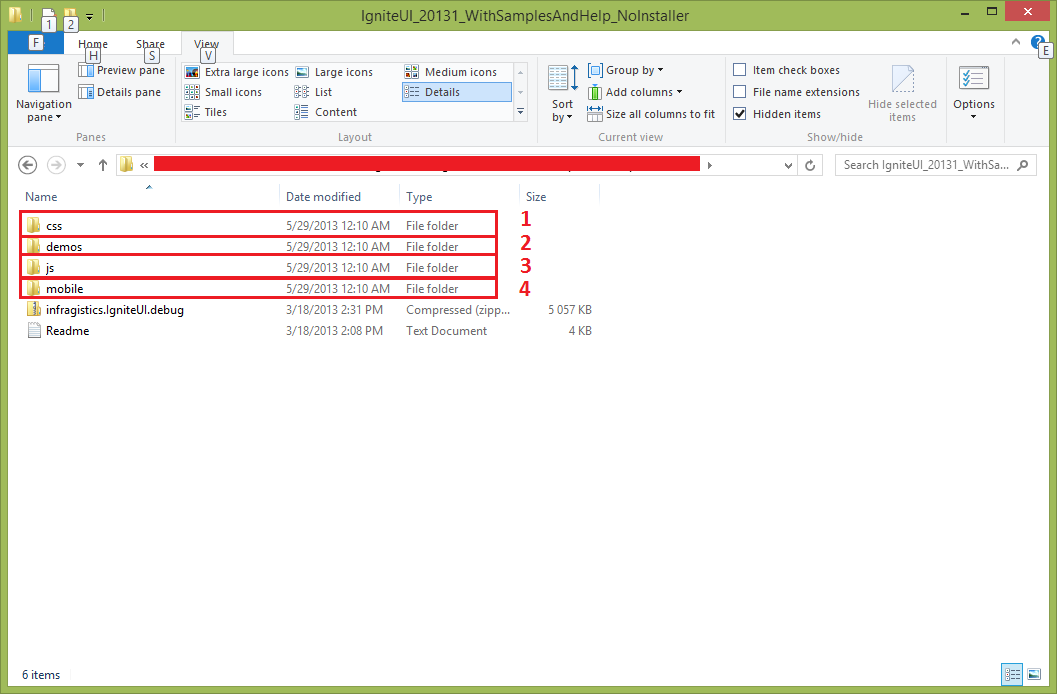
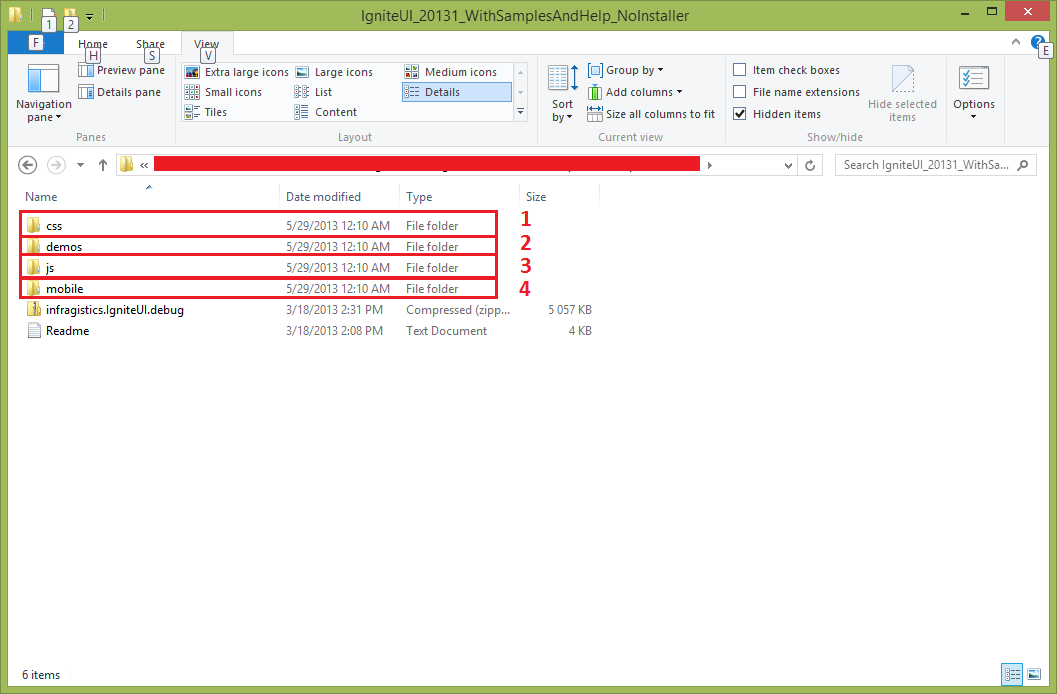
Open again Ignite UI source files. You need to copy in your project *.css and *.js files from these folders:

1 – css folder

3 – js folder

4 – mobile folder


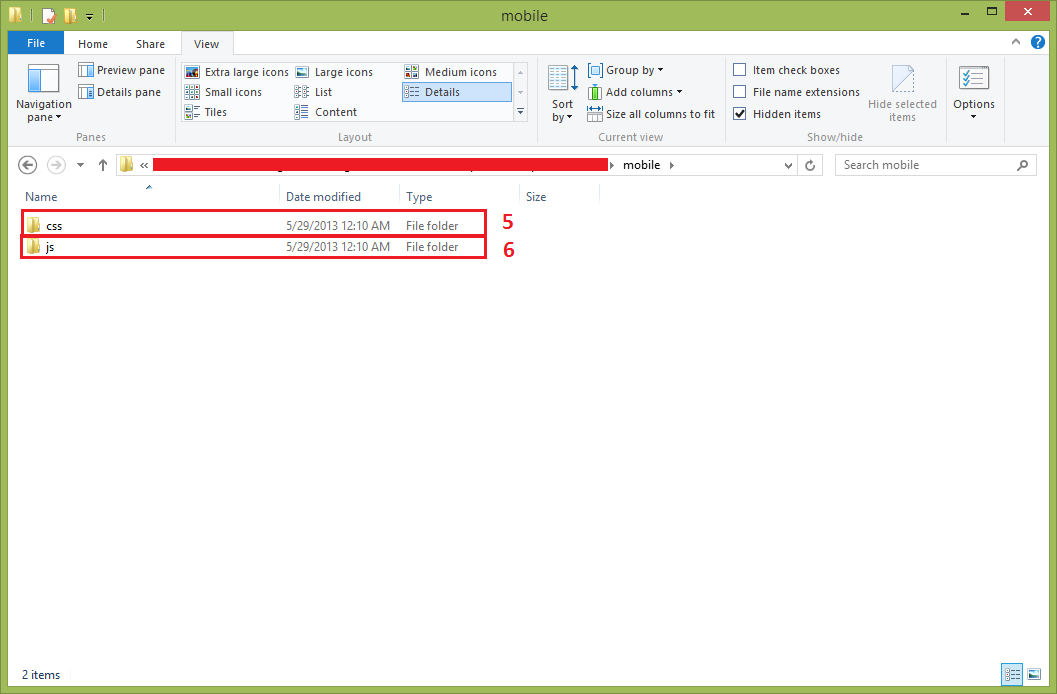
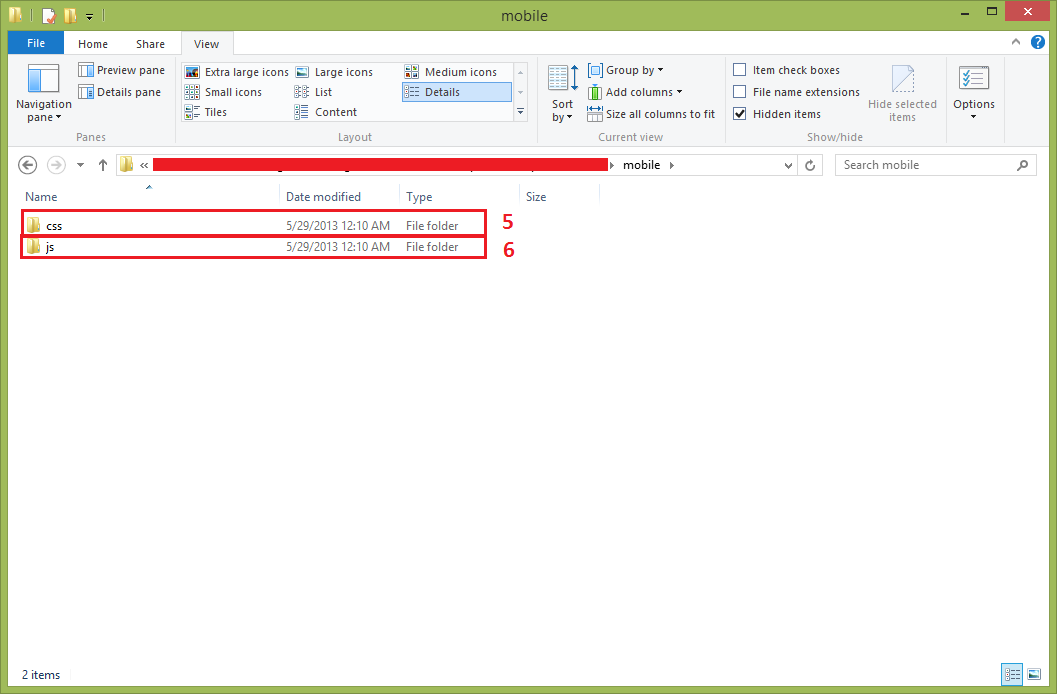
Under mobile folder you have again:

5 – css folder

6 – js folder


You need to copy these files under your Cordova www folder (in css and js folder) in accordance with the sample from this blog.


Add custom code in your Windows Phone 8 hybrid application

You need to add the following links for scripts and css files. The path will be in accordance with the folders where you will copy Ignite UI files.  Infragistics loader will load necessary files for Ignite UI mobile list. The theme “ios” is chosen just for example. It is a good practice to choose a theme in accordance with the current mobile platform styling guidance.


Add a code that will bind the specific device information (this information we will get from the Cordova framework). The device info will added in json array and bound to Ignite UI Mobile List View control


   1: $.ig.loader({
   2:     scriptPath: "Ig/js/",
   3:     cssPath: "Ig/css/",
   4:     theme: "ios",
   5:     resources: "igmList"
   6: });


   1:  
   2:           document.addEventListener("deviceready", onDeviceReady, false);
   3:           document.addEventListener("backbutton", onBackButton, false);
   4:  
   5:// once the device ready event fires, you can safely do your thing! -jm
   6:function onDeviceReady() {
   7:// IE does NOT provide an alert method, you can patch it with this line after deviceready.
   8:               window.alert = window.alert || navigator.notification.alert;
   9:  
  10:               console.log("onDeviceReady. You should see this message in Visual Studio's output window.");
  11:               updateDeviceInfo();


   1:var deviceInfo = [];
   2: $(document).bind("pageinit", function () {
   3:     $("#btnListViewBind").bind("click", function () {
   4:  
   5:         deviceInfo.push({ id: "platform", optionValue: device.platform });
   6:         deviceInfo.push({ id: "version", optionValue: device.version });
   7:         deviceInfo.push({ id: "uuid", optionValue: device.uuid });
   8:         deviceInfo.push({ id: "name", optionValue: device.name });
   9:         deviceInfo.push({ id: "device_width", optionValue: screen.width });
  10:         deviceInfo.push({ id: "device_height", optionValue: screen.height });
  11:         deviceInfo.push({ id: "colorDepth", optionValue: screen.colorDepth });
  12:  
  13:  
  14:         $("#basicJsonListView").igListView({
  15:             dataSource: deviceInfo,
  16:             bindings: {
  17:                 headerKey: 'id',
  18:                 primaryKey: 'id',
  19:                 textKey: 'optionValue'
  20:             }
  21:         });
  22:  
  23:     });
  24: });


You can see details in the sample application source code


Run the application

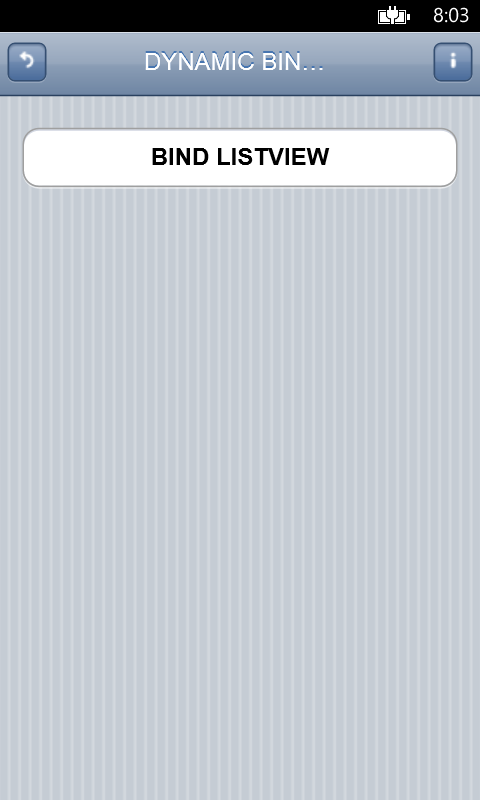
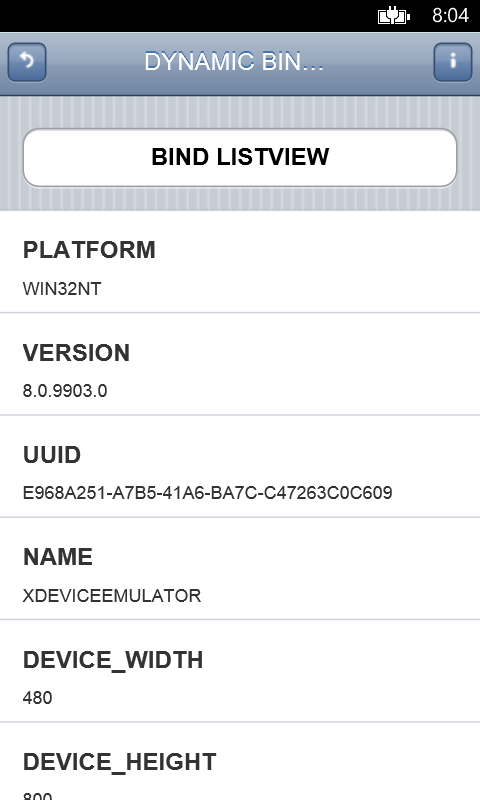
You will see the landing page with the button. When you press the button you will bind  information about the device to the Infragistics Mobile List View component


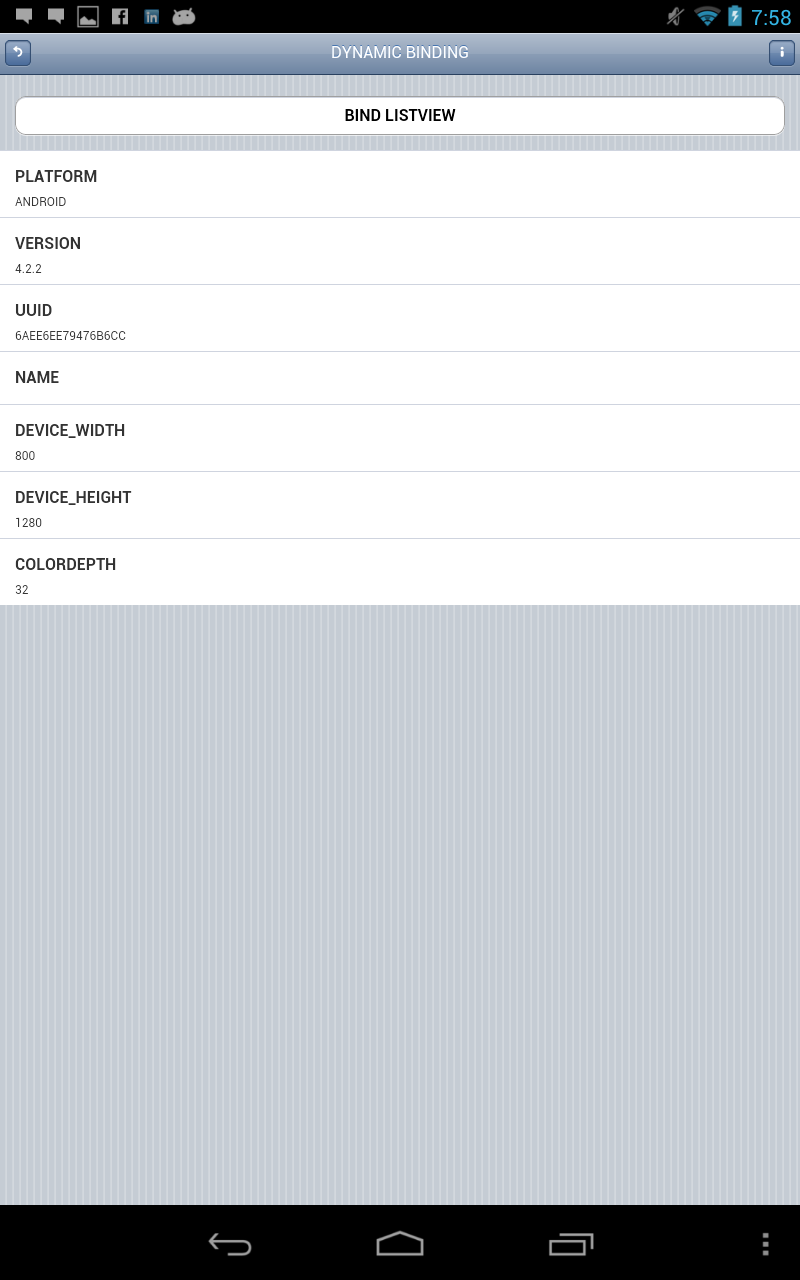
Finally you will see the device details in the Ignite UI Mobile List. It is very simple and easy.


Conclusions:

You can use Ignite UI mobile controls very easy in each Cordova / PhoneGap application. The most important is to add correct references to jQuery, jQuery Mobile and Ignite UI styles and scripts.

This example is focused on Windows Phone 8, but information about specific style and script references could be used for any platform. Expect soon more blogs about Infragistics Ignite UI components and PhoneGap for different platforms.


Sample source code with all referenced scripts and libraries you could download here:


You are probably thinking, how do I get my hands on Ignite UI Pivot Grid?  It’s easy. 

Click on this image to get a fully support trial version of Infragistics Ignite UI controls:

IgniteUI-download[1]

To view all the samples and code for HTML, MVC & ASP.NET, click here: .

http://www.infragistics.com/products/jquery/samples


Follow news from Infragistics for more information about new Infragistics products.

As always, you can follow us on Twitter @mihailmateev and @Infragistics and stay in touch on Facebook, Google+andLinkedIn!

Bizspark developer camps in Australia

$
0
0

Microsoft is again running developer camps around Australia to help train you in Windows Azure / Windows 8 / Windows Phone 8.

There are events happening in:

I will be attending the Sydney & Melbourne events next week! Helping out anyone that has questions, and also giving out a few Infragistics prizes.


More details on the event can be found at http://www.lalaninja.com.au/2013/05/09/bizspark-dev-camps-june-2013/

By David Burela

How to Start with VS Nomad and jQuery Mobile

$
0
0

Developers often want to use one development environment, but to build applications for different platforms. This case is especially  relevant when creating hybrid mobile apps with frameworks like PhoneGap

In general developers should use Visual Studio for Windows Phone 7.x / 8.x and Windows Store applications, Android Developer Tools for Android applications. If you want to build apps for iOS you need Xcode development environment and you’ll need to sign up as a member of the Apple Developer Program. You can also use Adobe PhoneGap Build where is possible to build your apps for different platforms. The last approach requires some additional work and it is not possible to build your applications directly from your development environment.

Using Nomad for Visual Studio allows you to create cross-platform mobile apps without the need to maintain multiple code bases. Nomad allows you to build apps using languages and tools you already know. Use your Visual Studio experience to build apps that use native device features like geolocation and offline storage using cross-platform HTML5 and JavaScript. More information about Nomad you can see here.


Sample application

In this post you will see how you can build Android hybrid application with Nomad for Visual Studio. Demo application will be based on the sample from the article

PhoneGap + jQuery Mobile for Windows Phone 8 Hybrid Applications”. We will use the sample html / JavaScript files and Nomad to build the same application for Android with Visual Studio (no need from Eclipse and Android Developer Tools).


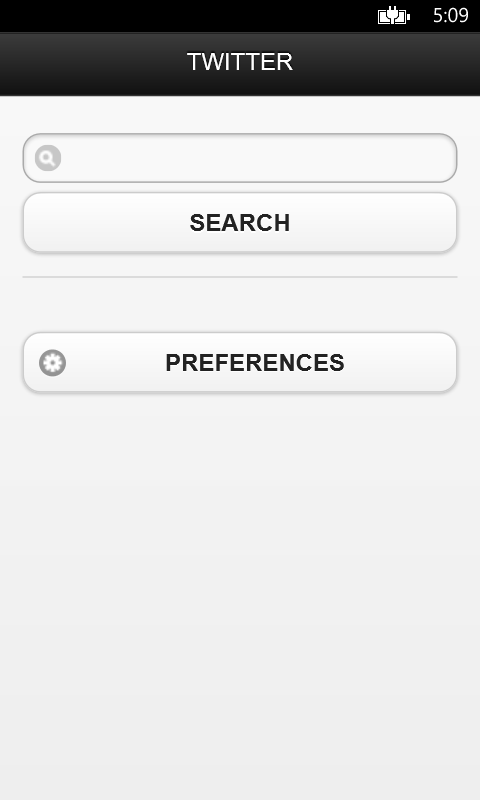
Sample twitter application for Windows Phone (built with Visual Studio and Cordova / PhoneGap)


Create a Nomad Project


Download and install Nomad for Visual Studio from http://vsnomad.com/ (you could use 7 day trial if you haven’t a license)


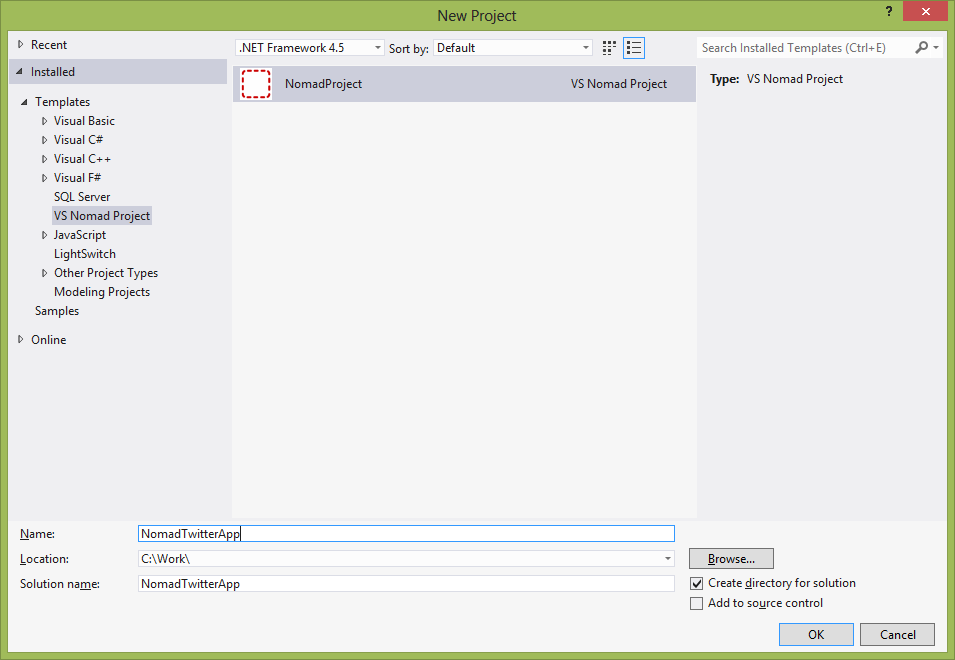
Create a new project: select File->New->Project and select VS Nomad Project


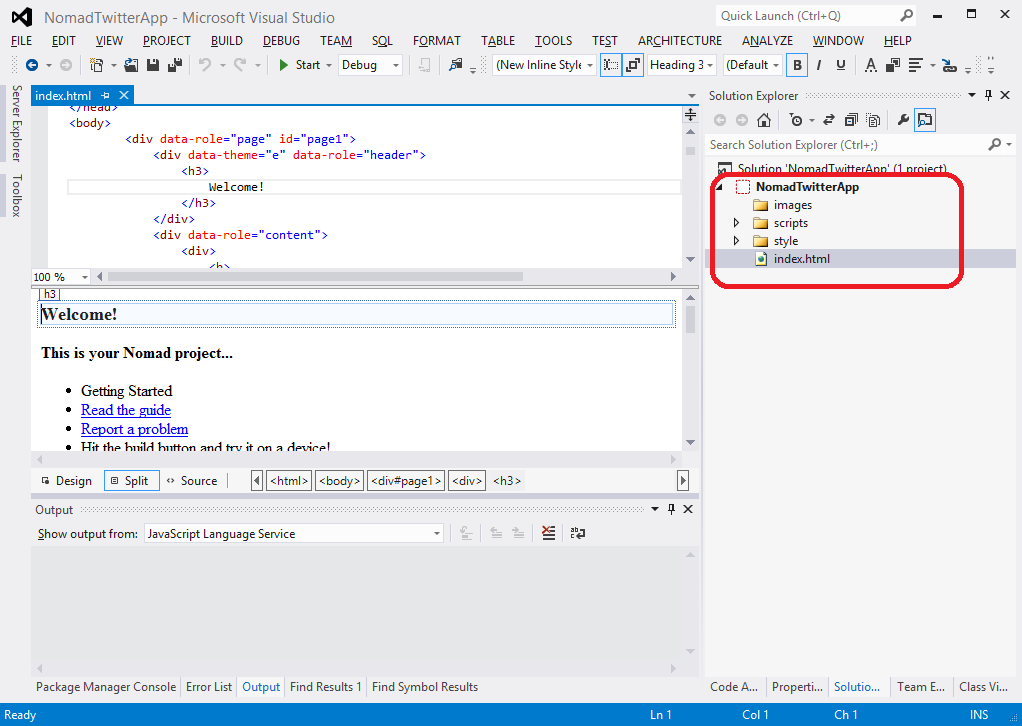
You will see only html / JavaScript files in the project structure. All other files are hidden for you.


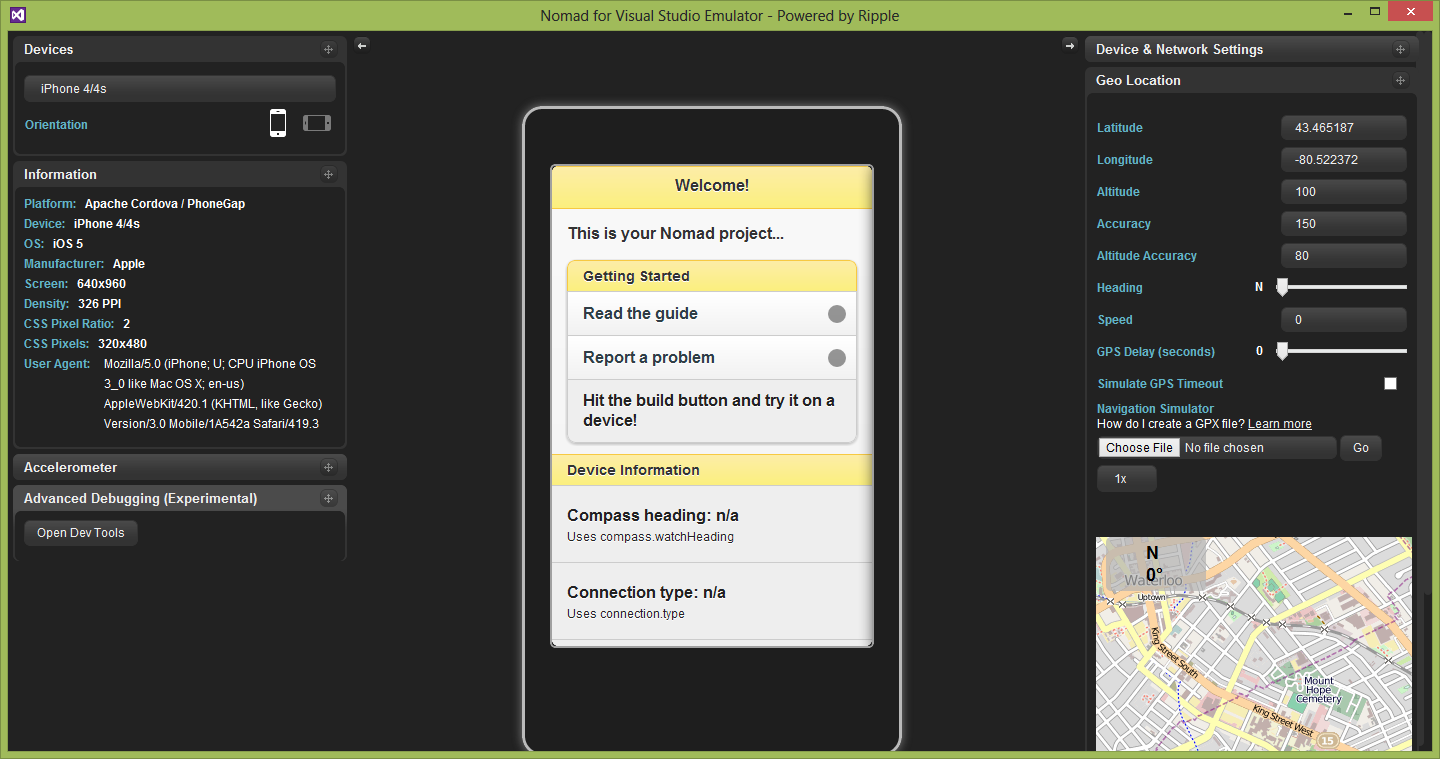
You can try the Ripple emulator when you debug the project (Ripple is a plug-in for the Chrome browser). You have no need to run phone emulator (like WP emulator in Visual Studio or Android emulator for Eclipse (Android Developer Tools)


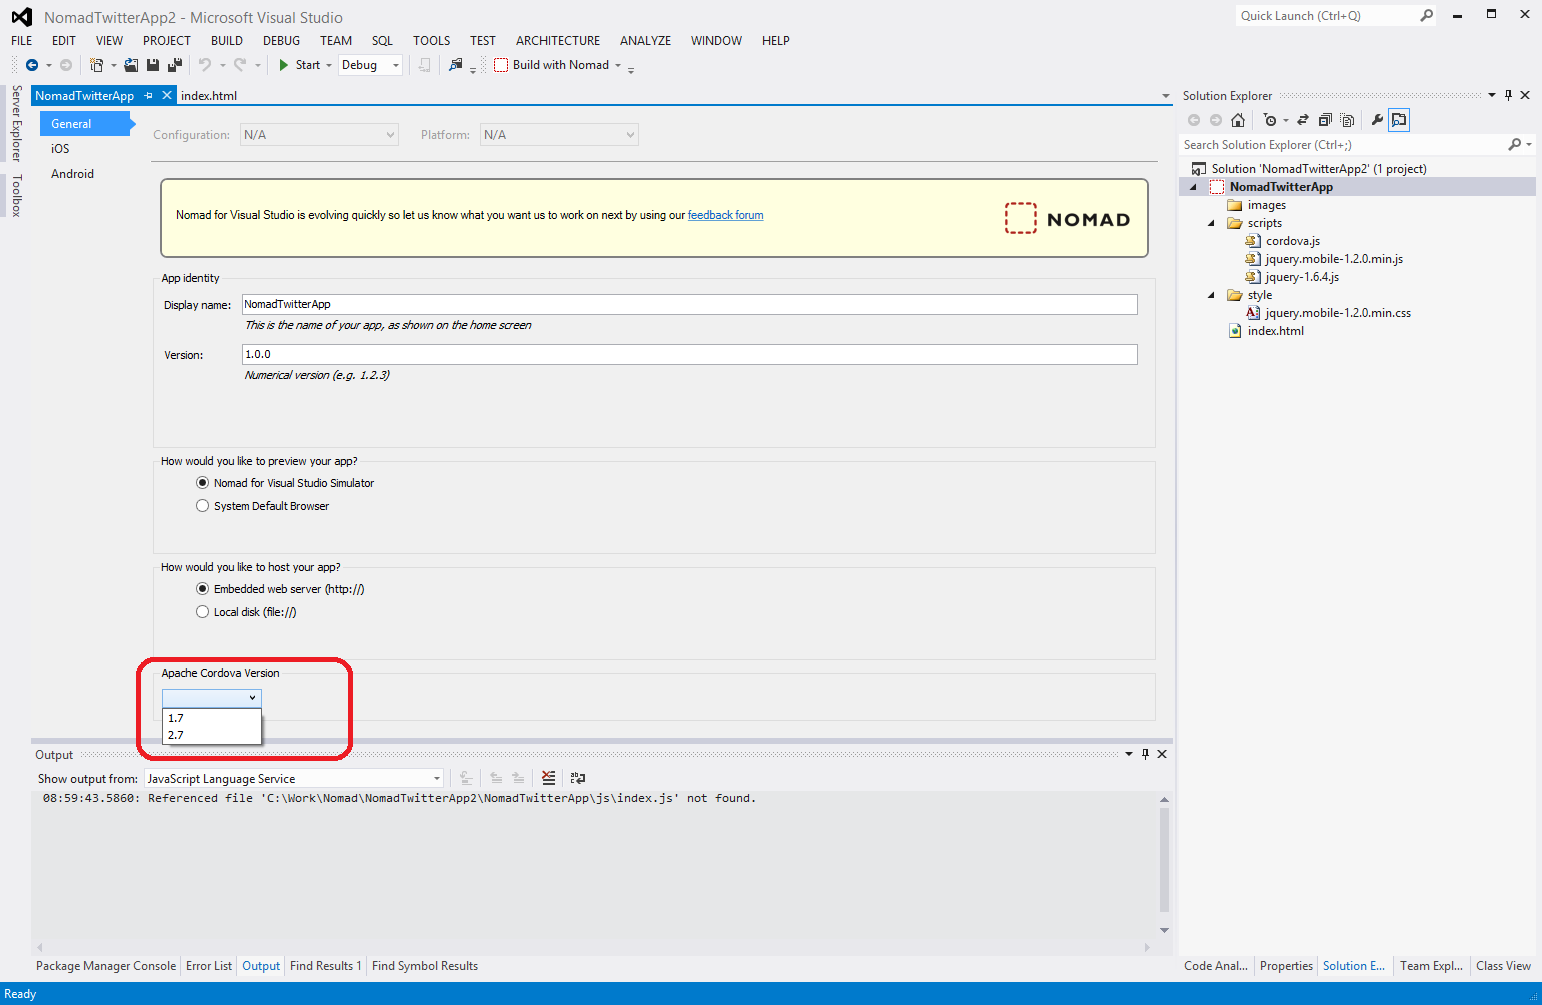
Choose the correct Cordova / PhoneGap version (you can choose between the latest PhoneGap 1.x and 2.x versions)


Modify your landing page (index.html). Nomad supports out of the box jQuery, jQuery Mobile and Cordova and if you have no need to use a different specific version there is no need to update manually references.

In our sample Nomad project uses jQuery 1.6.4 and jQuery Mobile 1.2.0. You can choose between Cordova 1.7 and 2.7 vesions.


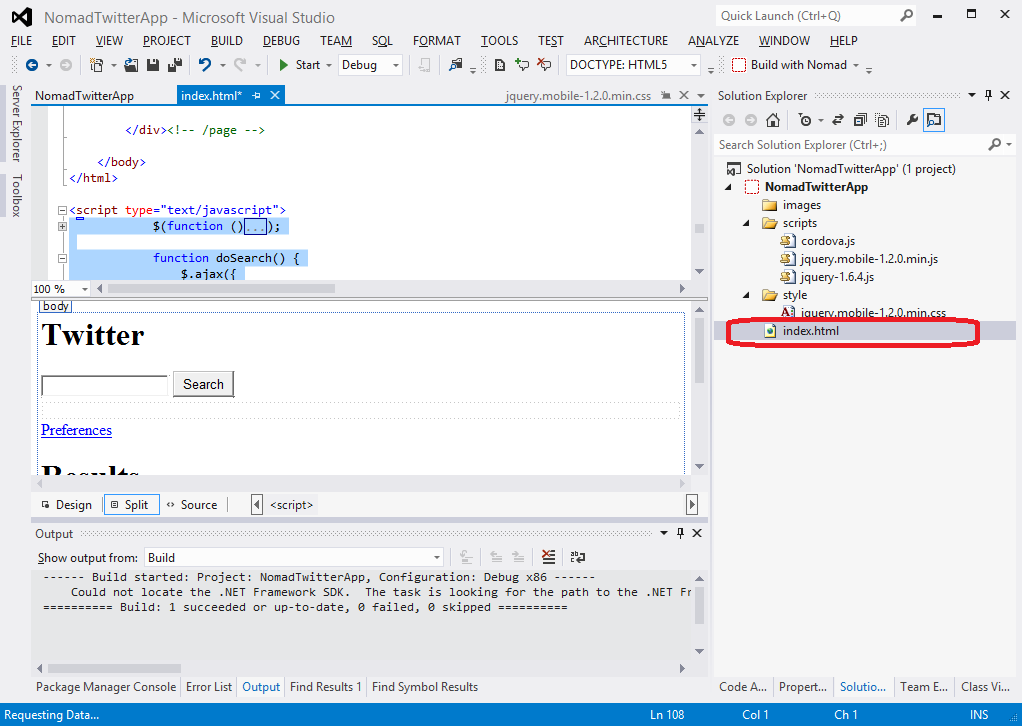
Add in the index.html page the html for your mobile app layout (it is the same like this one for Windows Phone)


   1:<!---- SEARCH PAGE ----->
   2:<divdata-role="page"id="page1">
   3:<divdata-role="header">
   4:<h1>Twitter</h1>
   5:</div><!-- /header-->
   6:  
   7:<divdata-role="content">
   8:<divdata-role="fieldcontain">
   9:<inputtype="search"name="search"id="search"value=""/>
  10:<inputtype="button"name="searchButt"id="searchButt"value="Search"/>
  11:</div>
  12:<divdata-role="content">
  13:<divid="twitList">
  14:
  15:</div>
  16:</div><!-- /content-->
  17:<ahref="#prefs"data-role="button"data-icon="gear"data-rel="dialog"data-transition="pop">Preferences</a>
  18:</div><!-- /content-->
  19:  
  20:
  21:</div><!-- /page-->
  22:<!---- RESULTS ----->
  23:<divdata-role="page"id="results">
  24:<divdata-role="header">
  25:<h1>Results</h1>
  26:</div><!-- /header-->
  27:  
  28:  
  29:</div><!-- /page-->
  30:  
  31:<!---- PREFERENCES ----->
  32:<divdata-role="page"id="prefs">
  33:<divdata-role="header">
  34:<h1>Preferences</h1>
  35:</div><!-- /header-->
  36:  
  37:<divdata-role="content">
  38:<divdata-role="fieldcontain">
  39:
  40:<labelfor="slider">Number of results:</label>
  41:
  42:<inputtype="range"name="slider"id="slider"value="15"min="0"max="100"/>
  43:<fieldsetdata-role="controlgroup">
  44:<legend>Result Type:</legend>
  45:<inputtype="radio"name="radio-choice-1"id="radio-choice-1"value="mixed"checked="checked"/>
  46:<labelfor="radio-choice-1">Mixed</label>
  47:  
  48:<inputtype="radio"name="radio-choice-1"id="radio-choice-2"value="recent"/>
  49:<labelfor="radio-choice-2">Recent</label>
  50:  
  51:<inputtype="radio"name="radio-choice-1"id="radio-choice-3"value="popular"/>
  52:<labelfor="radio-choice-3">Popular</label>
  53:</fieldset>
  54:  
  55:</div>
  56:</div><!-- /content-->
  57:</div><!-- /page-->


Add to search twitter, using twitter API (same as in the example for Windows Phone)

   1: $(function () {
   2:     $('#searchButt').click(function () {
   3:// Add a loading message before search starts
   4://$.mobile.pageLoading();
   5:         doSearch();
   6:     });
   7: });
   8:  
   9:function doSearch() {
  10:     $.ajax({
  11:  
  12:  
  13:         url: "http://search.twitter.com/search.json?q=" + $('#search').val() + "&result_type=" + $('input:radio[name=radio-choice-1]:checked').val() + "&rpp=" + $('#slider').val(),
  14:         dataType: 'jsonp',
  15:         success: function (json_results) {
  16:// Remove any list - so the new one can be added.
  17:             $('#twitList ul').remove();
  18:// Need to add UL on AJAX call or formatting of userlist is not displayed
  19:             $('#twitList').append('<ul data-role="listview"></ul>');
  20:             listItems = $('#twitList').find('ul');
  21:             $.each(json_results.results, function (key) {
  22:                 html = '<img src="' + json_results.results[key].profile_image_url + '"/>';
  23:                 html += '<h3><a href="#">' + json_results.results[key].text + '</a></h3>';
  24:                 html += '<p>From: ' + json_results.results[key].from_user + ' Created: ' + json_results.results[key].created_at + '</p>';
  25:                 listItems.append('<li>' + html + '</li>');
  26:             });
  27:// Need to refresh list after AJAX call
  28:             $('#twitList ul').listview();
  29:// Once all complete change the page
  30://$.mobile.changePage("#results", "slide");
  31:         }
  32:     });
  33: }


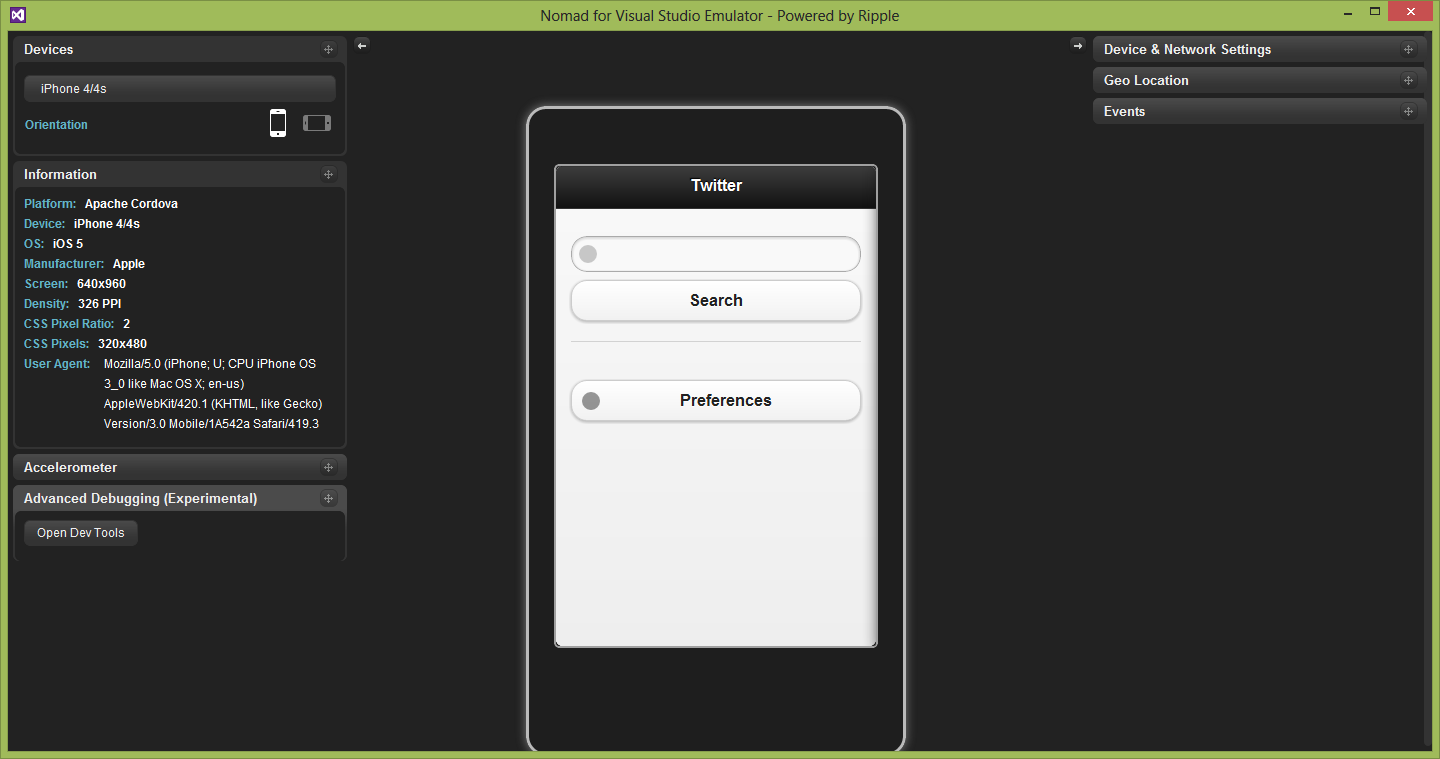
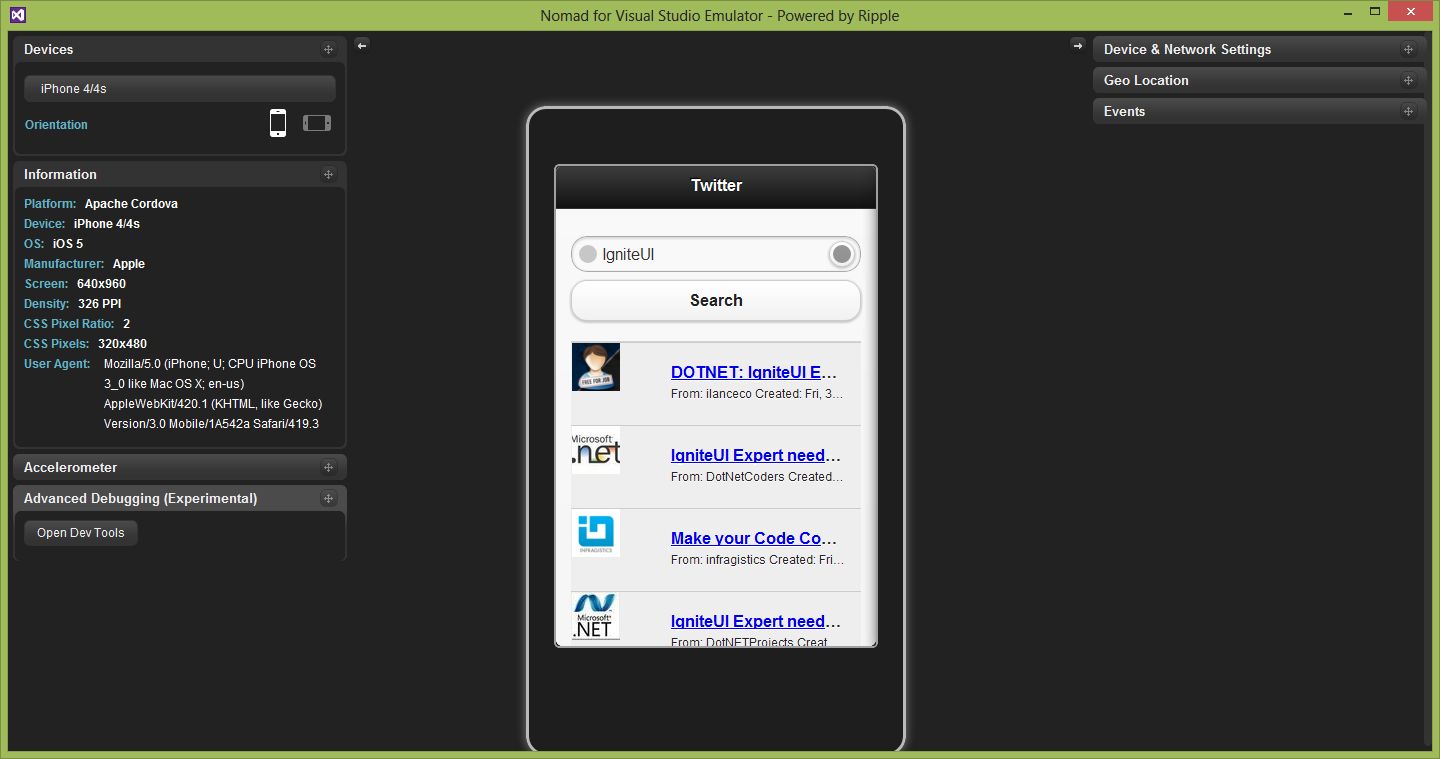
Start the Ripple emulator to try the twitter application


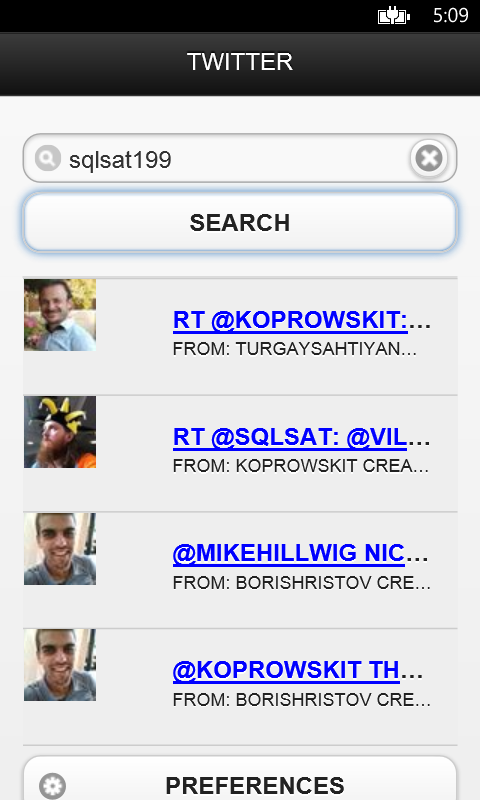
The sample application works correctly.


Build an Android application with Nomad for Visual Studio

If you've used in the past Adobe PhoneGap Build to build PhoneGap applications in the cloud it will be easy for you to understand how Nomad build Android and iOS applications.

Building the applications with Nomad is via Visual Studio and becomes asynchronous in the cloud.


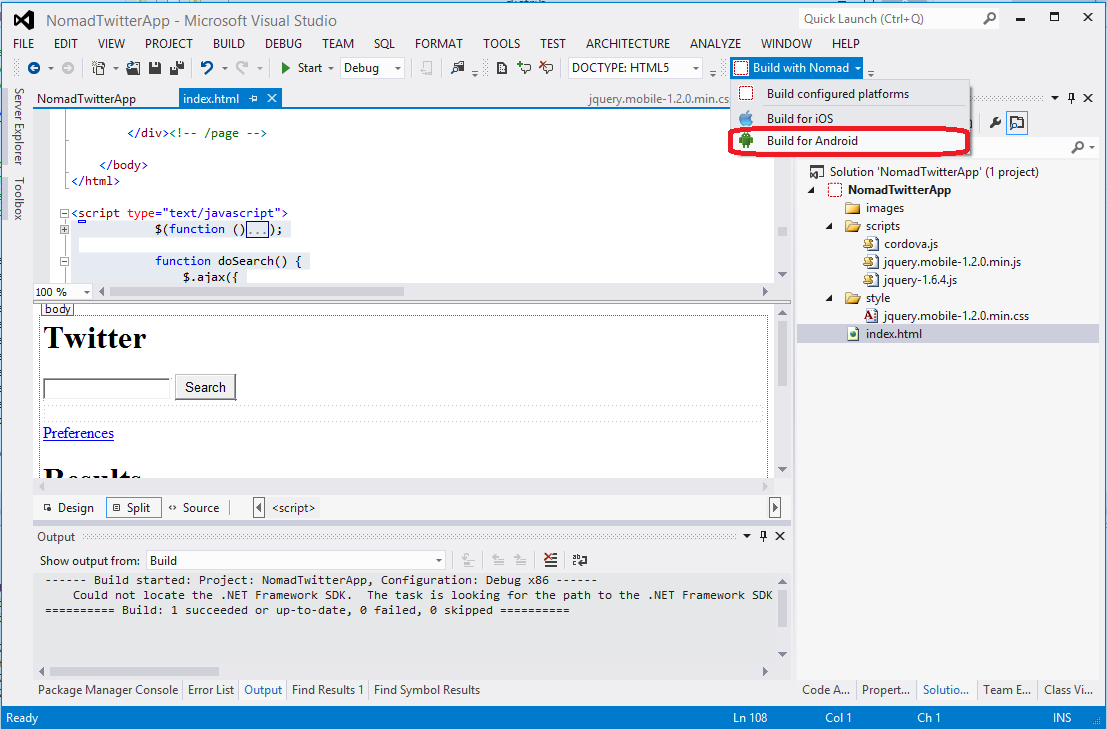
Chose in Visual Studio: Build with Nomad –> Build for Android


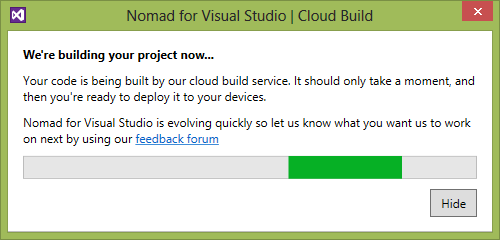
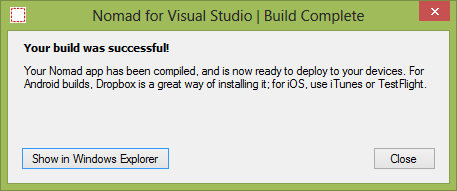
You will receive notification about the build progress.


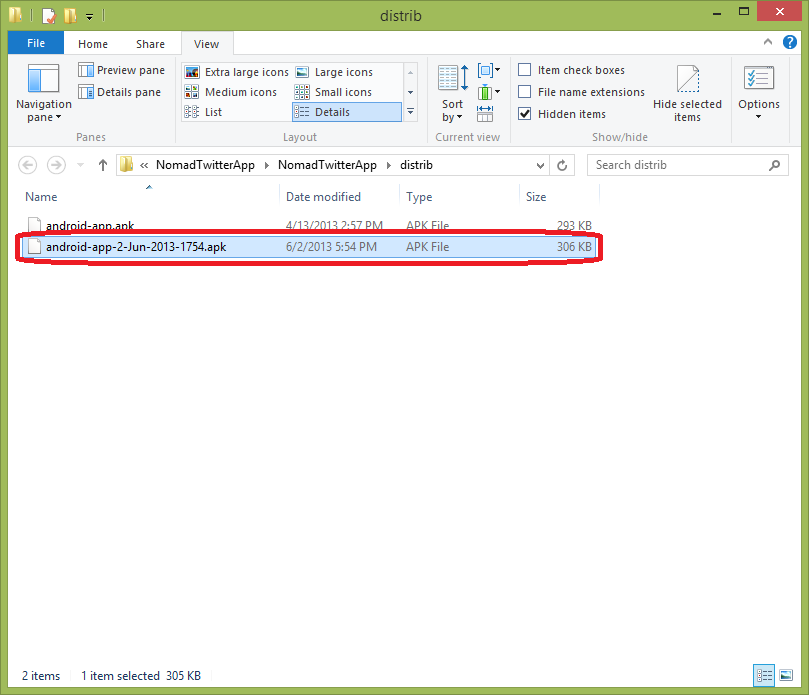
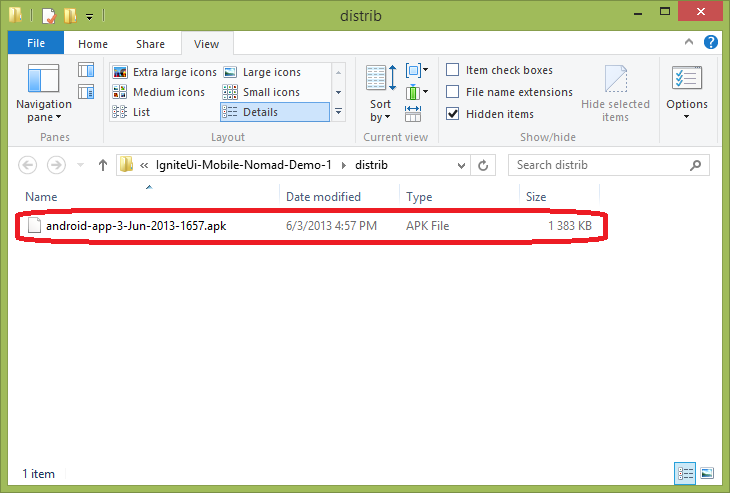
Finally the Android application will be downloaded to your local file system.


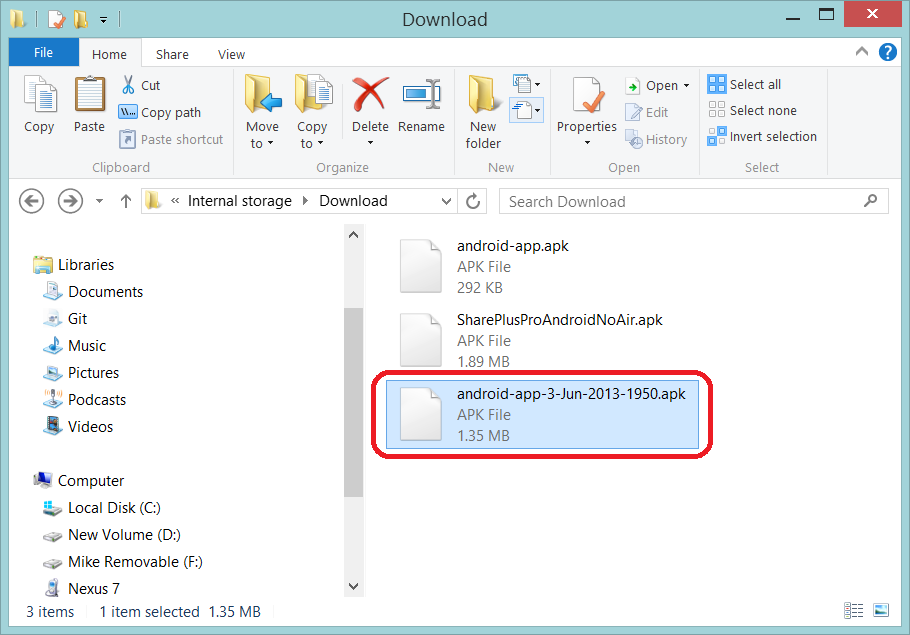
Copy the *.apk file (an Android application) to your Android device and install it.

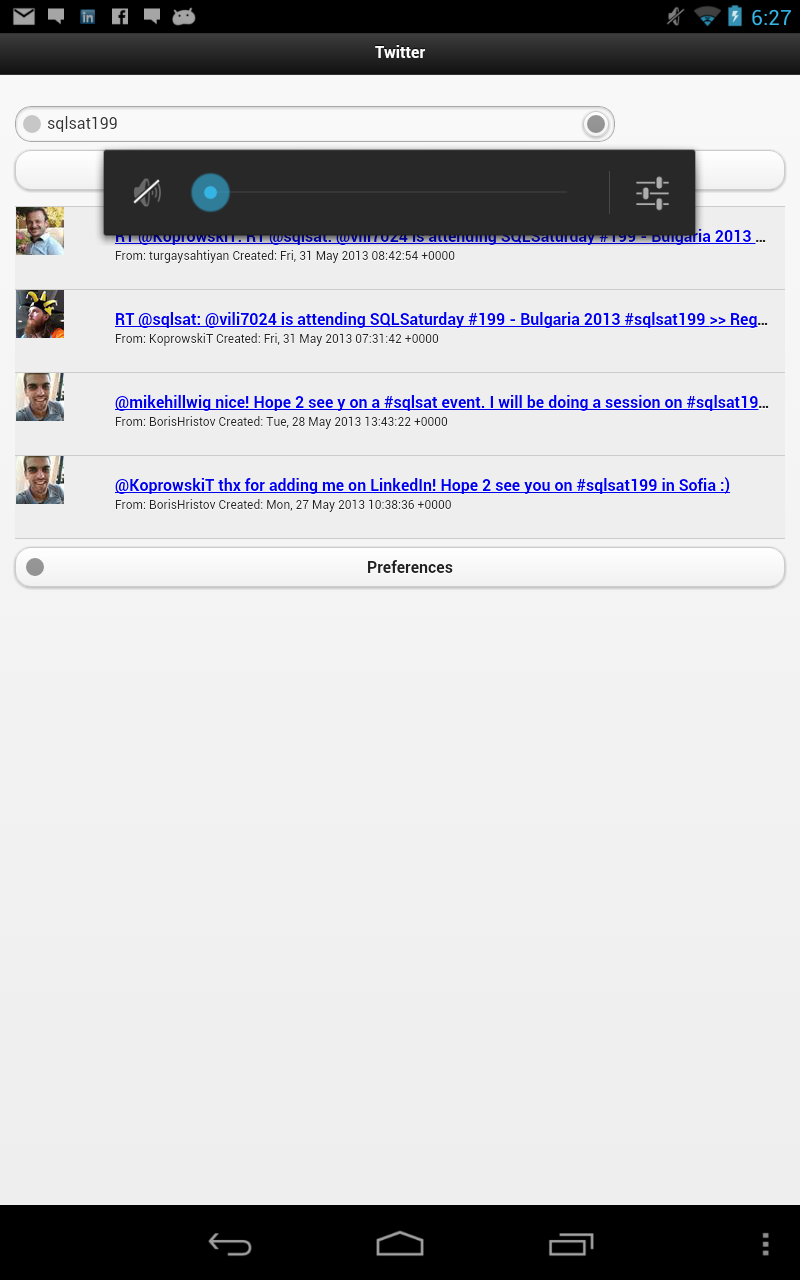
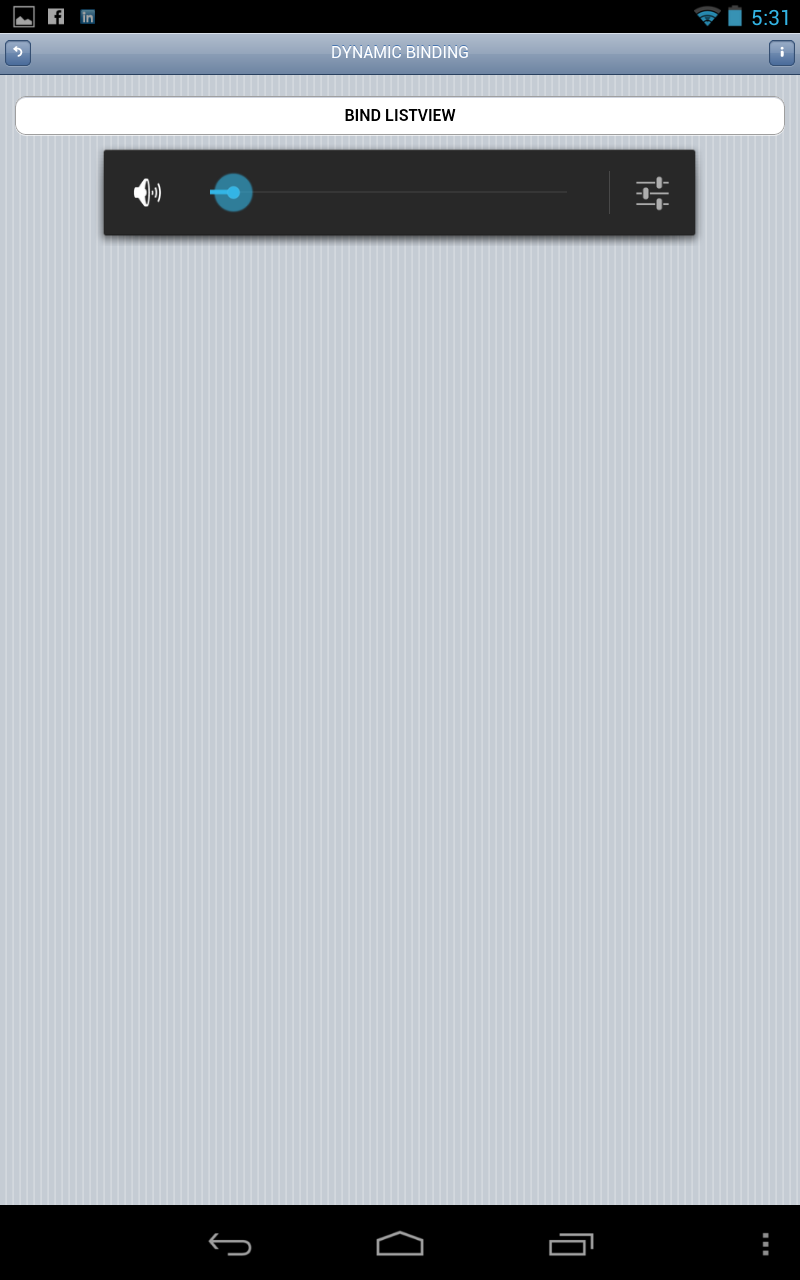
This screenshot is done from Google Nexus 7 tablet used for the our test.


Conclusions:

  • Red Gate Nomad for Visual Studio offers to build your PhoneGap applications for Android and iOS using VS 2012 (not only for Windows Phone / Windows Store applications)
  • Nomad projects offer out of the box jQuery, jQuery Mobile and Apache Cordova / PhoneGap support ( you have no need to add references)
  • In the Nomad projects developers could be focused only on html / JavaScript files (application layout and logic). Other PhoneGap files are hidden and you have no need to make any settings.


Sample source code with all referenced scripts and libraries you could download from this link:

A twitter application for Android, that we built in this sample could be downloaded here.

Expect next blogs where you will learn more about Nomad for Visual Studio and  PhoneGap /Cordova applications for different mobile platforms.


Follow news from Infragistics for more information about new Infragistics events.

As always, you can follow us on Twitter @mihailmateev and @Infragistics and stay in touch on Facebook, Google+andLinkedIn!

Moving from sharing business insight to collaborative dashboard design

$
0
0

Collaboration on business intelligence assets it's not only about sharing business insight. That's, no doubt, a big part of it. Once you come across a performance indicator that's out of range, or you identify a trend that's not going according to plan you will want to share that with others. It's only natural. But that's not all there is to collaboration on business intelligence

True collaboration is not just about sharing insight, but also about being able to build on top of what others have done. It's this ability to "step on the shoulders of giants", and realize that the slice of information you need, can be easily achieved by tweaking an existing dashboard someone else has shared. That's the real potential of collaborative business intelligence, the ability to collaborate on the creation and usage of business intelligence assets. 

This is one of the key features we believe make ReportPlus stand out in the mobile business intelligence segment. By allowing out of the box, to save dashboards in shared locations, such as: SharePoint document libraries, Google Drive or Dropbox folders, it empowers you to share your reports with the rest of your team, in such a way that it makes it really easy to open and edit what someone else has done, and pick up the design process from there.  BTW, ReportPlus also enables you to share business insights, by email as a screenshot, or exported powerpoint presentation but that's not what we are going to cover in this article.

Saving the dashboard to a shared location

By default when saving a dashboard with ReportPlus the save dialog prompts the user to choose whether the dashboard should be saved locally, or in a shared location. If the Cloud option is selected, the user must select a folder within the selected connection by tapping the Folder option of the save dialog. 

Save Report to cloud

For instance if the connection is a SharePoint site, the user may browse the structure of sub sites, and lists, searching for a document library where to save the dashboards. In the case of SharePoint it's highly recommended to use document libraries with versioning support enabled, which makes it easier to allow users to experiment, and share different versions of a dashboard, and if something when unexpectedly roll back to a previous version. 

Browse Data Source Report

Open shared dashboards

By tapping the open from cloud icon (Open Report From Cloud) in the left corner of the upper navigation bar in the initial view of ReportPlus users are able to navigate connections of the supported types, and open dashboards previously created by other team members. In order to edit dashboards you must tap the Edit button on the upper bar to switch to edit mode. 

Open Dashboard from Cloud repository

In the Enterprise version of ReportPlus this process is enhanced further by configuring a shared repository which is displayed right away upon opening the application, making it really easy to collaborate on dashboard design. In this version the user can easily toggle between the local and the shared location configured for his profile. In the following example we see folders that contain the different dashboards, for the different organizational areas of the company. Of course permissions are set independently in SharePoint, and inherited by ReportPlus. 

ReportPlus Enterprise Shared Folders


Read only dashboards

Sometimes it's ok to restrict what others might be able to do with a dashboard. For instance if the shared dashboard is going to cross organizational boundaries, you may want to share it in such a way that users will be able to open it, navigate it, zoom in and out charts, change filters values, etc, but not edit, or even see the way it's implemented. This may respond to a different level of expertise in the group of users consuming the dashboard, just to avoid inefficiencies of users "breaking" the dashboard without intending to, or to more complex reasons such as a lack of trust, or contractual obligations. In any case, this scenario is supported by ReportPlus, since it allows to set a password upon saving the dashboard, which forces the user who opens the dashboard to enter the password when and if he wants to edit it. 

The Future of JavaScript - What to Expect

$
0
0

JavaScript needs no introduction. So, instead of writing you a walkthrough for Javascript’s past, we’d like to take a peek into the future. The future is called Harmony. Harmony is the name given to the next version of the infamous client scripting language by the ECMA Committee. The ECMA is an international non-profit standards organization responsible for maintaining the JavaScript standard (known officially as ECMAScript). Harmony would officially be the 6th version of JavaScript, the 5th being the one currently in use, that was published in 2009.

ECMA isn’t exactly a fast moving body, and Harmony is probably still a couple of years off. It was first announced in 2008, and was initially expected to be finalized this year. However, as things stand there is no announced release date. Even without a date, you can check out the list of proposed new features on the ECMA Wiki.

This hasn’t stopped browsers from looking at the standard, and even implementing some of its features. The Chrome team has been at the forefront of this work, and already supports a number of the new proposed features, including:

  • Lexical Scoping
  • Collections
  • Weak Maps
  • Proxies

To enable these very developer focused features, you will need to set the appropriate flag in Chrome. Type ‘chrome://flags’ into the address bar (which reveals all possible experimental features) and select ‘Experimentable JavaScript features’. 

You won’t of course be able to rely on other users doing the same fiddling in Chrome, but this is a good way to at least test your own code and experiment a little. That way when Harmony does arrive, you should be set to hit the ground running.

A look at the future of JavaScript wouldn’t be complete without including some of the big libraries and frameworks that sit on top of the language. It could be argued that a lot of the innovation in the world of JavaScript comes from here these sources, so in part they are also the future of the language. The ones you should be keeping an eye on include:

jQuery

jQuery is now 7 years old, and is used in half of the world’s top 100,000 sites. Version 2.0 is currently in beta, and is faster and smaller than previous releases, partly as a result of dropping support for IE 6, 7, and 8. jQuery is very good at keeping the developer community in the loop on news versions, and actively seeks feedback from the community on new features.

Backbone.js

Backbone.js is one of the most well-known frameworks, great for rich client side applications. Development has been brisk, and there is a lot of support from the developer community.

Knockout.js

We looked at Knockout not too long ago; it is a Model-View-View Model framework, written by a Microsoft employee. As web apps become more and more desktop-esque, frameworks like Knockout will become more and more important. Knockout seems to have gained a lot of traction very quickly, so it is worth looking at in the long term.


How to Build Android Applications with Ignite UI Mobile Controls and Nomad for Visual Studio

$
0
0


Developers would like to use one development environment to build PhoneGap / Cordova hybrid applications for different platforms.

For now programmers should use different development environments for different platforms:  Visual Studio for Windows Phone 7.x / 8.x and Windows Store applications, Android Developer Tools for Android applications, Xcode for iOS apps.

Using Nomad for Visual Studio allows you to create cross-platform mobile apps without the need to maintain multiple code bases. Nomad allows you to build apps using languages and tools you already know. Use your Visual Studio experience to build apps that use native device features like geolocation and offline storage using cross-platform HTML5 and JavaScript. More information about Nomad you can see here.


With Ignite UI, developers can create browser based, touch-enabled tablet, mobile & desktop experiences.  Ignite UI is a set of advanced HTML & JavaScript user interface controls based on jQuery Core, jQuery UI and jQuery Mobile JavaScript libraries. Ignite UI includes a complete set of Mobile controls with adaptive CSS, so you are covered when building your iPhone, Android & Windows Phone applications. The latest version – Ignite UI 13.1 was released on April 18, 2013
 

This post is about how to build rich touch-enabled Android applications with Infragistics Ignite UI and Red Gate Nomad for Visual Studio. You will see how easy you could use both products: Ignite UI and Nomad to create a really cool mobile apps.


Sample application

In this post you will see how you can build Android hybrid application with Nomad for Visual Studio. Demo application will be based on the sample from the article “Creating Windows Phone Applications with Ignite UI Mobile Controls and PhoneGap”. 

We will use the sample html / JavaScript files and Nomad to build the same application for Android with Visual Studio (no need from Eclipse and Android Developer Tools).


Create a Nomad Project


Download and install Nomad for Visual Studio from http://vsnomad.com/ (you could use 7 day trial if you haven’t a license)

Create a new project: select File->New->Project and select VS Nomad Project


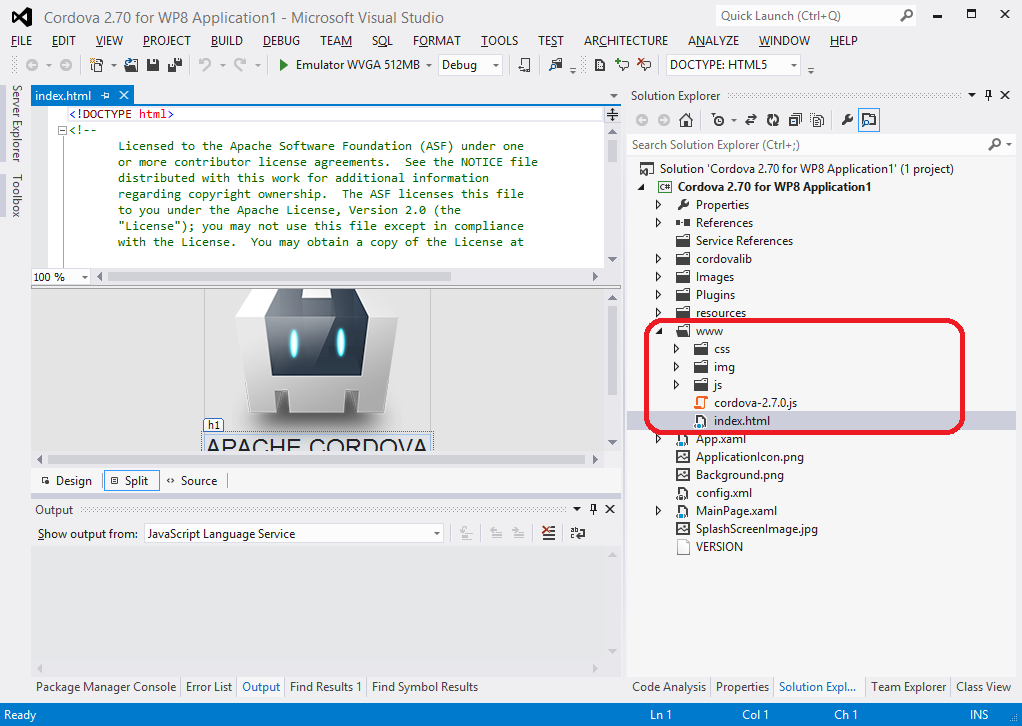
You will see the structure of the Nomad project. The default structure is a little bit different than the standard Cordova application ( In the Nomad project *.js files are under the scripts folder and *.css files are under the style folder)


Update PhoneGap application to support Ignite UI

Open again Ignite UI source files. You need to copy in your project *.css and *.js files from these folders:

1 – css folder

3 – js folder

4 – mobile folder


Under mobile folder you have again:

5 – css folder

6 – js folder


You need to copy these files under your Nomad project root folder (in css and js folder) in accordance with the sample from this blog. It is possible to copy these files under the scripts and style folders but in this case you should carefully interpret examples of Ignite UI documentation


Don’t forget to add the Cordova script for the correct platform ( in our case this is Cordova for Android).


Update the Nomad project structure.

A – css folder (all Ignite UI *.css files)

B – js folder (all Ignite UI *.js files)

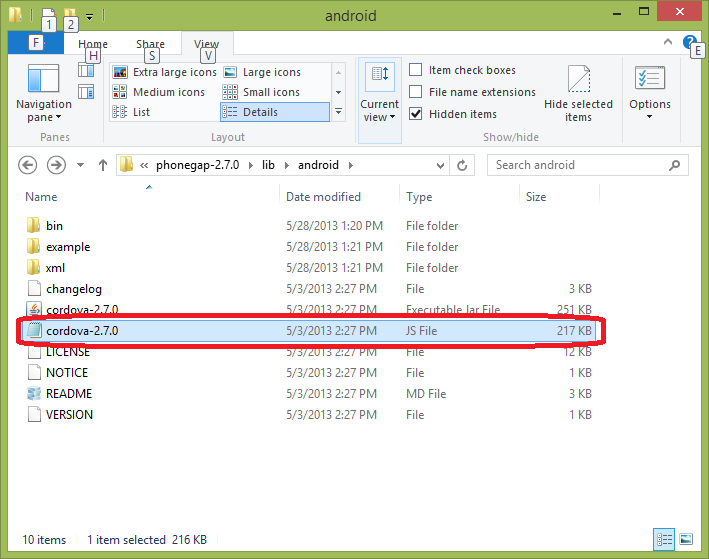
C – cordova-2.7.0.js for Android

D- landing page (index.html). You  need to add client code to that file.


Add custom code in your Android hybrid application

You need to add the following links for scripts and css files. The path will be in accordance with the folders where you will copy Ignite UI files.  Infragistics loader will load necessary files for Ignite UI mobile list. The theme “ios” is chosen just for example. It is a good practice to choose a theme in accordance with the current mobile platform styling guidance. This code is the same that we are used in the article “Creating Windows Phone Applications with Ignite UI Mobile Controls and PhoneGap”.


Add a code that will bind the specific device information (this information we will get from the Cordova framework). The device info will added in json array and bound to Ignite UI Mobile List View control

   1: $.ig.loader({
   2:     scriptPath: "Ig/js/",
   3:     cssPath: "Ig/css/",
   4:     theme: "ios",
   5:     resources: "igmList"
   6: });


   1:  
   2:           document.addEventListener("deviceready", onDeviceReady, false);
   3:           document.addEventListener("backbutton", onBackButton, false);
   4:  
   5:// once the device ready event fires, you can safely do your thing! -jm
   6:function onDeviceReady() {
   7:// IE does NOT provide an alert method, you can patch it with this line after deviceready.
   8:               window.alert = window.alert || navigator.notification.alert;
   9:  
  10:               console.log("onDeviceReady. You should see this message in Visual Studio's output window.");
  11:               updateDeviceInfo();


   1:var deviceInfo = [];
   2: $(document).bind("pageinit", function () {
   3:     $("#btnListViewBind").bind("click", function () {
   4:  
   5:         deviceInfo.push({ id: "platform", optionValue: device.platform });
   6:         deviceInfo.push({ id: "version", optionValue: device.version });
   7:         deviceInfo.push({ id: "uuid", optionValue: device.uuid });
   8:         deviceInfo.push({ id: "name", optionValue: device.name });
   9:         deviceInfo.push({ id: "device_width", optionValue: screen.width });
  10:         deviceInfo.push({ id: "device_height", optionValue: screen.height });
  11:         deviceInfo.push({ id: "colorDepth", optionValue: screen.colorDepth });
  12:  
  13:  
  14:         $("#basicJsonListView").igListView({
  15:             dataSource: deviceInfo,
  16:             bindings: {
  17:                 headerKey: 'id',
  18:                 primaryKey: 'id',
  19:                 textKey: 'optionValue'
  20:             }
  21:         });
  22:  
  23:     });
  24: });


You can see details in the sample application source code


Run the application in debug mode

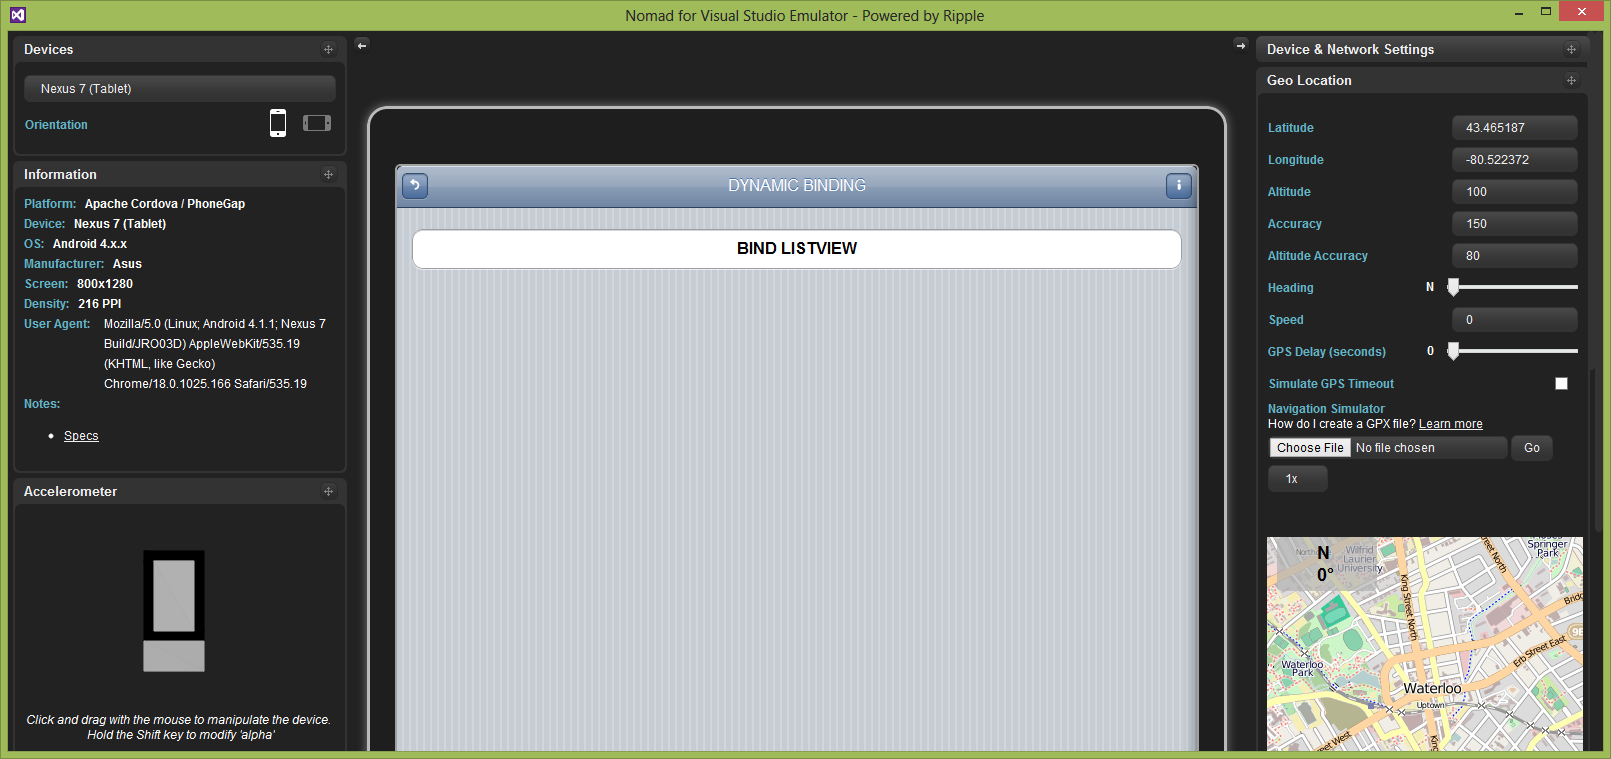
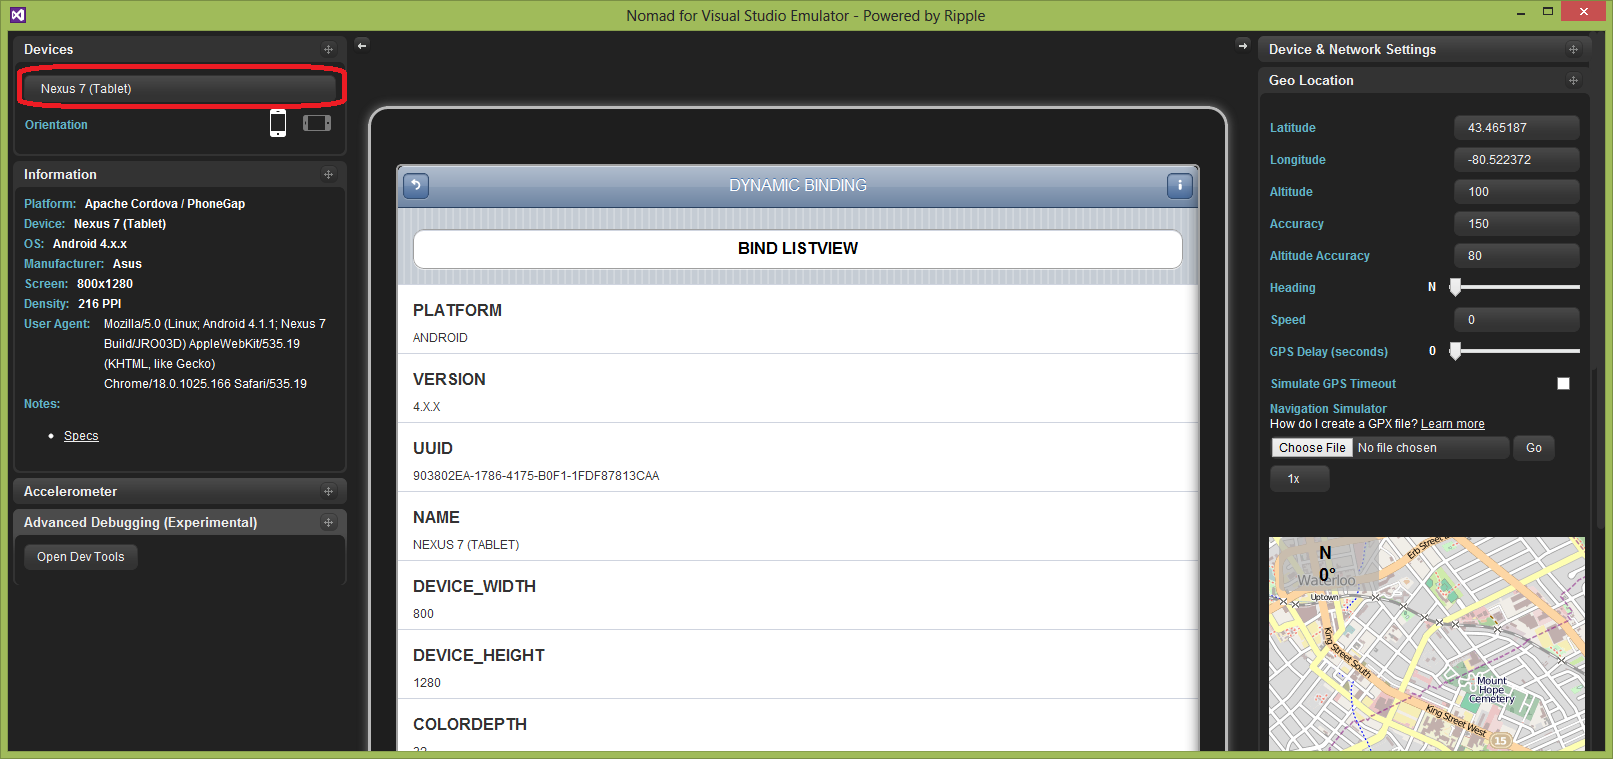
You can try the Ripple emulator to debug the project (Ripple is a plug-in for the Chrome browser). You have no need to run phone emulator (like WP emulator in Visual Studio or Android emulator for Eclipse (Android Developer Tools)

In the landing page you will see a button. When you press the button you will bind  information about the device to the Infragistics Mobile List View component


Build an Android application with Nomad for Visual Studio


Building the applications with Nomad is via Visual Studio and becomes asynchronous in the cloud.


Chose in Visual Studio: Build with Nomad –> Build for Android


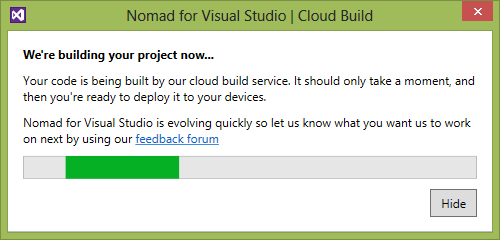
You will receive notification about the build progress.


Finally the Android application will be downloaded to your local file system.


Copy the *.apk file (an Android application) to your Android device and install it.


Try the application on your android device: install and run it.

Screenshots are from Google Nexus 7 tablet used for the our test.


Conclusions:

  • Red Gate Nomad for Visual Studio could use Ignite UI components in the same way like standard PhoneGap / Cordova  applications (you just need to add the correct *.js and *.css references and implement the code that use Ignite UI components).
  • Nomad projects offer out of the box jQuery, jQuery Mobile and Apache Cordova / PhoneGap support , but if you want migrate mobile web applications probably is better to add references for specific versions of these libraries, used in your web app.
  • You should be careful to reference the correct version of Cordova for your platform (Android)
  • You can use pretty easy without any issues Nomad and Ignite UI together.


Sample source code with all referenced scripts and libraries you could download here:

An Ignite UI application for Android, that we built in this sample could be downloaded from this link:

You are probably thinking, how do I get my hands on Ignite UI Pivot Grid?  It’s easy. 

Click on this image to get a fully support trial version of Infragistics Ignite UI controls:

IgniteUI-download[1]

To view all the samples and code for HTML, MVC & ASP.NET, click here: .

http://www.infragistics.com/products/jquery/samples


Follow news from Infragistics for more information about new Infragistics products.

As always, you can follow us on Twitter @mihailmateev and @Infragistics and stay in touch on Facebook, Google+andLinkedIn!

Introduction to Systematic Program Design

$
0
0

Once upon a time, on an afternoon late last week, it was a pleasant 98 degrees here in Cranbury, NJ…  On that day, a young Infragistics employee was sitting in the temperature-controlled office, pondering what to do that afternoon that would both keep her out of the sweltering heat, but also not bore her to tears (mind you, Game of Thrones Season 3 Episode 9 hadn’t been released yet at this time, so she wasn’t busy crying herself to sleep at night). A few moments later, a reminder appeared in her inbox from Coursera. Introduction to Systematic Program Design was beginning on Monday. Success! The young lady now had a purpose in life for the next eight weeks.

And so begins the next installment of D-Coding… The University of British Columbia’sIntroduction to Systematic Program Design, provided online by Coursera.

Course Requirements & Purpose:

Duration: 8 Weeks

Homework: Once a Week

Quizzes: Once a Week

The main learning goals for this course are (excerpted from the syllabus):

  1. Understand a systematic design process.
    This is demonstrated by being able to write programs for a reasonably complex task, where the ability to use the "one task - one function" rule can be demonstrated.
  2. Understand that programs are written both to run on computers and for people to read. 
    This is demonstrated by being able to write code that is readable, well organized, documented, and tested.
  3. Understand the relation between information and data. 
    This is demonstrated by being able to design the data representation for a reasonably complex problem, and to describe the information encoded in the given data.
  4. Understand that the structure of the data a program operates on determines many elements of the program's structure. 
    This is demonstrated by being able to identify correspondences between a data definition and a program that operates on that data. Also by being able to identify how potential changes to a data definition would affect a program.
  5. Understand that one can replace repetitive code with an abstraction in a systematic way. Understand that this is at the heart of designing libraries. 
    This is demonstrated by being able to produce examples of code before and after abstraction: before, where one can see the repeated code, and after, where one can see the abstraction and verify that it provides the solution to the original problem, as well as several other similar problems. Students should also be able to design a program that uses existing libraries or existing code to solve a new problem.
  6. Understand that programs can be described using notations other than code, and that these models can facilitate program design. 
    This is demonstrated by being able to identify correspondences between non-code models of a program and the program itself and by being able to use non-code models in program design.

Overview/Summary:

I’m definitely really excited for this class, and I think it’s really interesting that it will be taught in a “made up language”, specifically created for students that are taking this course progression. I’m excited by that because it truly feels like everyone is on the same plane, and I’ll be learning from the ground up, without any preconceived notions about how familiar the student body is with a particular language. 

In addition, the instructor took a lot of time in the first two videos (that’s how far I’ve gotten so far) to ensure the students that the Pythagorean theorem is the “hardest math” we’ll be doing, which, if you’ve read “Casting Variables in C (No, You’re Not Just Bad at Math)”, you’ll know makes me very, very grateful.

I’m going to do my best to update weekly with summaries of what I’m learning, so anyone that’s interested can follow along. AND if anyone out there is also taking this class, feel free to ping me and we can chat about it!

Questions/Comments?

Feel free to comment here on my blog, or find me on Twitter @DokiDara.

By Dara Monasch

Infragistics Friends Group Presentation: Cloud Computing - Technology Evolution - Event Recap

$
0
0

Infragistics Friends group (Bulgarian BI PASS Chapter) with the help of Infragistics Inc.  organized a presentation on the following topic: Cloud Computing - Technology Evolution.


The event was held on Wednesday, June 5th at Infragistics Bulgaria Office, 110B, Simeonovsko Shosse Bul., Sofia, Bulgaria.


Speaker was Miroslav Lessev . Miroslav Lessev is a PhD candidate at Faculty of Economics and Business Administration, University of Sofia "St. Kliment Ohridski" in Implementation of modern computer engineering in economic studies and is currently an Expert DBA in CSC Bulgaria. He has a study on cloud computing and its effect on economics and people and more than 12 years of experience in designing, developing, implementing and supporting databases.


The presentation focused on the history of Cloud Computing. Were considered problems are solved and the advantages of cloud systems. The lecturer explained why each program, system or infrastructure can be seamlessly transferred to work in the cloud environment, this transition remains completely transparent to the users.

There was an interesting discussion about the cloud computing advantages: In the cloud the experts from all fields can focus on their tasks without being directly affected by the activities of other participants. Then each user has access to the highest quality of required services and companies have the opportunity for painless transition from capital costs into operating ones.


Miroslav Lessev in action:


The Gartner research results.


As always, you can follow us on Twitter @mihailmateev and @Infragistics and stay in touch on Facebook,Google+andLinkedIn!

HTML5 Doctor - HTML5 Resource of the Day

$
0
0

Today’s HTML5 resource is HTML5 Doctor. HTML5 Doctor is a wonderful resource for both learning HTML5 and referencing the elements of HTML that have changed in HTML5. This is definitely one of those sites you will want to have bookmarked if you are doing work with HTML5. Let’s look what’s available on this site and how it can help you.

html5-doctor2

Articles

The HTML5 Doctor site has a ton of articles listed under the Article Archive that are grouped into sections such as “HTML5 Getting Started”, “HTML5 Semantics”, “JavaScript Goodness”, etc. While some of these articles are out of date, most of them remain relevant and in some cases are even updated from time to time. This is a great place to look if you want to read more about a particular part of HTML5 development. The latest article from May 3, 2013 is about subheadings and subtitles.

Element Index

The Element Index is quite possibly the most useful section on HTML5 Doctor. The Element Index contains all of the elements that are either new or have been redefined in HTML5. Each element has a description and a link to the specification as well as a very handy code snippet. If there is an article on HTML5 Doctor about the element, it will be linked to with the words “Our prognosis” (for instance, for the abbr element). This quick reference is a very valuable resource and is the main reason I keep HTML5 Doctor in my bookmark list for HTML5.

HTML5 Doctor Resources

In addition to the Article Archive and Element Index mentioned already, there are a few more resources available on the site that are helpful. If you are trying to understand the new sectioning tags in HTML5, the HTML5 Sectioning Element Flowchart might be a big help to you.

h5d-sectioning-flowchart

The wonderful Dive Into HTML5 online book by Mark Pilgrim has been maintained by HTML5 Doctor after Mark stopped maintaining the project. This is very useful since HTML5 has continued to evolve since the book was originally written. There is a GitHub repository for the book if you want to help out.

There is also a list of “Recommended HTML5 Books”. This is a pretty good list and I’d definitely recommend checking some of them out if you are looking for some reading material.

Summary

HTML5 Doctor is a relatively small site compared to some of the resources that have come before it in this series. The quality of the content and the amount of coverage packed into that small size make it a resource you will keep coming back to though. I highly recommend checking this site out.

Contact

If you have any questions or comments, feel free to contact me at bschooley@infragistics.com or find me on Twitter @brentschooley.


Ignite-jQuery-650x80

Blend Storyboards - An Introduction

$
0
0

Before we jump into Blend storyboards, you might have gotten here looking for Infragistics’ Indigo Studio storyboards (example shown above). They are very different things—Indigo Studio uses the more traditional meaning of the word—telling a story with pictures and words (on a board). We go a step beyond and integrate working prototypes into the storyboard boxes. If you’re interested in that, learn more about storyboarding in the software design process, and then you can go check out and download Indigo Studio to try it out for yourself. In addition to storyboarding, Indigo Studio is a rich, code-free prototyping and wireframing tool.

The rest of this article focuses on Microsoft Blend’s use of the term, which as you’ll see is more technical and tied to the XAML technologies.

What is a Storyboard?

Consider that you want to change one or more properties of controls based on either a time constraint or some user interaction or some event. This can be achieved through an animation.

Consider that you want to group one or more animations into a container and be able to organize and control its working. This can be achieved through a storyboard.

In an Expression Blend application, a storyboard is a resource containing a collection of timeline objects such as animations, each of which targets a specific property of a control. Animations here mean actions that temporarily change the property values of elements. For example, an animation action can comprise a button changing its color when mouse hovers over it. Or you could have a series of actions like rendering a continually moving ellipse and changing its color periodically. You can accomplish this by organizing these actions in a storyboard and controlling how the storyboard works.

Why Use Storyboards?

Storyboards can be started, stopped, or paused by using triggers that are set on objects, by using behaviors, or by using event handlers. When a storyboard is selected, a pop-up menu helps to duplicate, reverse, delete, rename, or close the currently selected storyboard. You can set the properties of a storyboard to make it automatically reverse or repeat when it has reached the end of its last timeline.

Where Can We Create Storyboards?

Storyboards can be created in the following locations (or scopes) of your application:

  • Within the main body of your document:   You can create your animation timelines in the main body of your document if your application needs to present an animation, or if you do not require reusing the animation elsewhere.
  • Within a scene or user control: You can create your animation timelines in a user control if you plan to reuse an animation several times in a single application, or in another application.
  • Within the template of a control: You can create the animation in the template of the control if you need all the controls of a specific type in your application to be animated in the same way.
  • Within a state: If you want to modify the animation that occurs after transitioning to a new state, you can select the state in the States panel, and then click Show Timeline  in the Objects and Timeline panel to make your changes.

How to Create Storyboards

Storyboards are created in Blend using the Storyboard picker.

  1. Launch Expression Blend 4 and create a Silverlight 5 application.

Figure 1 shows the New Project dialog box that is displayed when creating a Silverlight project using Blend.

Figure 1 - New Project Dialog Box

  1. Add a Button control to it.
  1. Then, launch the Storyboard Picker by clicking the + symbol and selecting the New option.

Figure 2 shows the New option in the Objects and Timeline pane. 

Figure 2: New Option

  1. In the Create Storyboard Resource dialog box that is displayed as seen in figure 3, leave the default name as is. In a real-world scenario, you would always change it though. 

Figure 3: Create Storyboard

  1. Use the drop-down option in the Objects and Timeline section to open the newly created Storyboard.

Figure 4: Open a Storyboard

  1. Select the Properties pane for the Button and after scrolling to the Transform property group, choose Scale option and specify the X and Y values as 2.5 each.

Any actions that are done at this stage, such as this transform setting, is recorded as part of the storyboard.

  1. To stop the recording, click the red icon that says “Storyboard1 timeline recording is on”.

Figure 5: Storyboard recording in progress

Click the Play icon u to play the storyboard.

You will see the button being shrunk in size.

This was a very basic example. You can create far complex storyboards with lots of actions in them.

What is the Storyboard Class?

The Storyboard class defined in  System.Windows.Media.Animation namespace represents a storyboard. This class defines a property called Children, which represent a collection of animation objects. These animations are started when the Storyboard is started. The Storyboard class has its own set of methods for starting, stopping, pausing, and resuming animation actions.  The Storyboard class provides the Storyboard.TargetName and Storyboard.TargetProperty attached properties. You set these properties on an animation to specify its target object and property. When you add animations as child timelines of the Storyboard, you can organize and apply the animations through the storyboard. In XAML, BeginStoryboard object should be used with an EventTrigger, Trigger, or DataTrigger. In code-behind, the Begin method should be used.

The Begin() method of a storyboard can be invoked in an event handler to start the storyboard actions at a particular instant.

Consider an example. Open the application created earlier.

  1. In the Properties Pane for the button, click the lightning bolt symbol to open the Events pane.
  2. Add an event for Button_Click. If you are using Visual Studio 2010 Express Edition or Visual Web Developer Express Edition, then you will have to manually copy the event handler to the Page.xaml.cs file. Otherwise, in other editions such as Professional edition, the event handler is automatically added to the Page.xaml.cs file.
  3. Within the event handler, in the Page.xaml.cs file, add the following code (marked bold for your reference):

  1. Save, build and test the application. Click the button on the browser output and see the animation action.

For more on storyboards, Microsoft has a great resource here.

Fast Click support for IgniteUI on touch-enabled devices

$
0
0

If you open a webapp on a touch device and start interacting with it - clicking on links, buttons, etc. - you will immediately notice that it feels sluggish and that there is a delay between the moment you tap with your finger, and the moment there is visible cue that some action starts executing. To be more precise, there is indeed a delay, and it is 300 ms - that's the time that will pass before a click event is fired, after a tap event is received by the browser. The delay is required mainly because of double taps and multi-touch guestures like pinching - by adding the delay, the browser ensures that no click event will be fired before the end user has a chance to perform pinching, double tapping, etc. And it actually simulates a click so that all webapps, that have been designed for desktop, can also work on touch devices, without having to explicitly handle touch events. The problem with that is obvious - it makes your app feel slow. and most web apps don't handle double taps, pinches, etc. Therefore they don't need this delay. in this blog post i will present a very simple and elegant way to remove the delay, and have a fast and responsive webapp on touch devices. 

there are multiple solutions that exist on the web, but FT Labs has created a particularly great library that handles the above issue. It has many cases covered for different browser versions and different platforms. I have additionally modified it in order to support mousedown and mouseup events. Some of the components in IgniteUI listen to mousedown/mouseup, instead of just click, and that's necessary, otherwise fast clicks won't work the the original source code. I have forked the project on github and applied the patches to fastclick.js:
https://github.com/attodorov/fastclick

In order to enable fast clicks in your app, you only have to do two things - include a reference to the forked fastclick library, and attach the FastClick object to the document's body, so that everything in your app is fastclick-enabled. Note that you can also attach it to a specific container, in case you don't want to have everything in the document's body receive fast clicks. 

Include this reference:

<scripttype="text/javascript"src="https://raw.github.com/attodorov/fastclick/master/lib/fastclick.js"></script>

Include this script in thesection of your page:

<scripttype="text/javascript">
	window.addEventListener('load', function() {
		FastClick.attach(document.body);
	}, false);</script>

Now your application, including all of the IgniteUI components will react instantly to end-user taps ! 

Run Indigo Prototypes on Any Device

$
0
0

HTML5 Logo

Just wanted to give folks an update. We are heads down on all the awesome goodies coming up here in Version 2. At the same time, we're wrapping up testing for the release of our HTML-based prototype viewer. Once this is released, we won't be offering the Silverlight viewer. But you don't have to wait to start sharing and evaluating prototypes on any modern device.

Read About Running on HTML During the Beta Here

I'm totally psyched about this capability for Indigo. It's a huge enabler, not just because HTML (and CSS and JavaScript) is hip and cool and oh so modern, but because it's so easy to create rich, interactive--even animated--prototypes in no time and evaluate them working on the actual target devices with no hassle. Super low cost, rapid learning and iteration. Amazing!

Version 2 is going to enhance the value of this story big time, so keep your eyes peeled. Subscribe to our RSS or follow us on Twitter.

Also, we will be offering a huge discount for upgrades from our totally free Version 1 available now, so get it while you can!


What to expect from the WWDC 2013 Keynote

$
0
0

WWDC is Apple’s Worldwide Developers Conference and it kicks off today with an always much anticipated keynote. The keynote event can be streamed online so tons of internet traffic will be pouring through Apple’s datacenter starting at 10AM Pacific. I thought it might be fun to summarize what I think we can expect to see in the keynote and see how much of it comes to pass and see what ends up being a surprise.

iOS 7

7

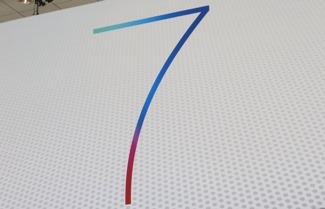
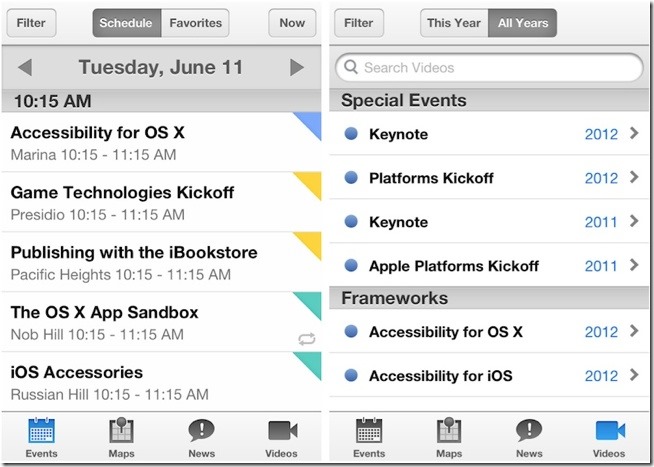
We know iOS 7 is coming and we can expect it to have a much flatter look from a design perspective. If the rumors of a redesign under Jony Ive weren’t enough, the WWDC poster for iOS 7 (shown above) should give much more weight to these rumors. The very thin font multi-colored 7 used to represent the operating system lines up nicely with the descriptions of how the new design might work. Many of the rumors have stated that each Apple application will have its own single color highlight that will compliment an otherwise relatively “black and white” experience. One look at the recently released WWDC app gives some hints as to what this might look like:

wwdc_2013_app

As for new features in iOS 7, clearly there will be some. Most of the rumor focus has been on the redesign though, so most of it would be pure speculation at this point. I would expect to see some major new APIs though as there are a ton of sessions at WWDC this year that are marked “Session to be Announced”. The contents of these sessions won’t be known until after the keynote so something has to fill them.

OS X 10.9

X

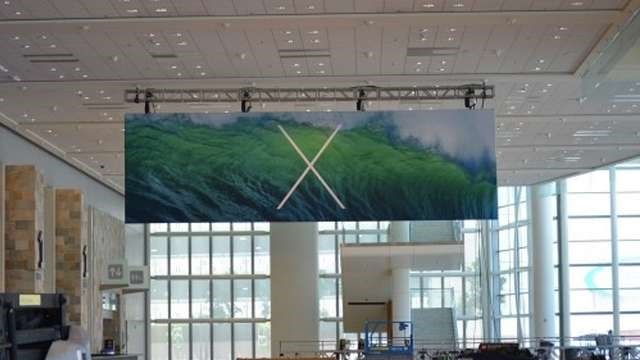
Given the thin font is present in the X used on the OS X poster, I can only assume we’ll see similar design changes on the desktop OS as well. Most of the rumors surrounding changes in OS X have focused on power user features. These include things like a new tabbed interface for the Finder and a new fullscreen mode that allows multiple fullscreen workspaces on a system with multiple monitors. It is unclear whether or not Siri will make its way to OS X or not.

One other thing Apple has mentioned in its WWDC lead up is that the developer tools have been revamped. It’s not clear at this point what has changed, but I’m hopeful for some major improvements on this front.

iTunes Radio

An Apple streaming radio service has been long rumored and was supposedly scheduled to be released in the iOS 6 timeframe. Most Apple watchers have suggested that it has been very difficult for the company to get all of the record industry on board. It seems as though they have everyone on board at this point and we may see something released on this front at WWDC this year.

New hardware

New MacBooks of some sort using Intel’s new Haskell processors are almost a given this year. Apple’s online store is already down which always suggests new hardware is on the way. Based on some leaked retail SKU numbers it seems pretty clear that the MacBook Air line will be updated. What’s less clear is whether or not the MacBook Pro line will get any updates at this time. Both are due for updates soon though so it wouldn’t surprise me either way.

Another rumor for new hardware has centered on the fact that recent builds of OS X include support for Broadcom chips supporting 802.11ac WiFi. If the new MacBooks support this wireless chip it seems fairly obvious that Apple will need to offer new AirPort Extreme and Time Capsule products that support this higher speed wireless.

Surprises?

Maybe we’ll see an iWatch or an iTV. Who knows. All I know is I’m looking forward to WWDC.

Contact

If you want to reach me, I’m easiest to find on Twitter @brentschooley but you can also email me at bschooley@infragistics.com.

devLink 2013 @ Chattanooga Convention Center

$
0
0

Developers from around the nation, enrich your internal knowledge database (a.k.a. your brain) at devLink 2013. Held in Chattanooga, Tennessee from August 28th – August 30th, devLink brings some of the brightest minds in the development world together in one place for a weekend jam-packed with conferences, seminars, and workshops. With dozens upon dozens of events scheduled throughout the weekend, devs from all spectrums of the great technological world will have no shortage of opportunities to learn something awesome.

Tickets to the event will grant you access to both of the keynote speeches by Scott Hanselman and Nicholas Zakas and entrance into all seminars.  You will also have the option to purchase premium level tickets that will include daily meals, access to exclusive networking events, and a commemorative event t-shirt. The choice of tickets remains yours, so equip yourself with a laptop or tablet, and get ready to become an even better developer than you already are!

Infragistics very own Brent Schooley will be at devLink, delivering his "Designing for Windows 8" and "Creating iOS Apps with C# Using Xamarin.iOS" talks. You can catch “Designing for Windows 8” on Thursday the 29th at 9:30am and “Creating iOS apps” at 2:30pm on the 29th.

We also invite you come by the Infragistics booth, where you will be able to demo our high-performance UI toolset for HTML5/jQuery, IgniteUI! Learn something cool, and grab an Infragistics water bottle to help keep your whistle wet throughout the weekend while you’re at it.

One lucky visitor to the booth will also receive a voucher for a free license of Ignite UI (valued at $595), so be sure to come say hello. See you at the show!

SharePoint Mobile Access Solution: SharePlus

$
0
0

SharePlus by Infragistics is a proud sponsor of SharePoint-Community.Net

For those of us who are SharePoint advocates, there simply is no substitute for direct, smooth SharePoint access, regardless of the device. The need for Mobile SharePoint accessibility at the level to which avid users are accustomed has finally been addressed by Infragistics’ SharePlus product.

If there is one mobile tool out there that is truly meant to work hand-in-hand with all of the functions of SharePoint, it would be SharePlus. Upon starting up SharePlus for the first time, you’re immediately able to access and edit documents on your SharePoint, online or offline, without needing to install server components.  The ability to securely access your calendars, intranets, documents and task lists on your iPhone, Android, Blackberry or iPad without having to jump through a bunch of annoying setup hoops is a much needed breath of fresh air.

Whether you use SharePoint as a business traveler, around the office complex or at your home office, SharePlus is an absolutely essential tool. With its clean UI, users from novice to the expert are able to navigate SharePlus with the same comfort as the native desktop SharePoint interface.

In addition to the ease of use benefits, Enterprise level organizations love SharePlus. Not only can you apply your corporate branding to your mobile SharePoint solution, but SharePlus also employs the same top-grade security measures that you are familiar with from your office network.

Mobile access, locked down security measures, and an easy to navigate interface to name a few features, make SharePlus a “no-brainer download” for those of us who use SharePoint on a regular basis, from the individual user to full-fledged corporate adoption. Interested in SharePlus Enterprise? For more information, Register Here!

Special Announcement

Infragistics is currently sponsoring a contest on SharePoint-Community.net! Check it out for your chance to win an Acer Iconia W3-810 Windows 8!

Introduction to Systematic Programming – Week 1

$
0
0

For those of you just tuning in, check out the “Intro” to the Introduction to Systematic Programming series here for some more background on what we’re about to get into.

If you’ve been here since last week, I’m sure you’re waiting with bated breath to hear how the first week of classes went. Well, the wait is over!

Week 1 consisted of 9 lessons centered around the topic of Primitives in Dr. Racket. I’ll go through each lesson here one by one, giving a quick description of the main topic points we covered and any interesting additional tidbits I may have picked up. Please remember that some terms in this class, as mentioned in post 1, are used in a different manner than most traditional programming. I’ll try to note this when I can, but in some cases, I may not even be aware of how it is used traditionally, since a lot of this is new to me as well!

Lesson 1: Introduction to Systematic Program Design

The primary point covered in this first lesson is that, “Computation is what makes ‘things’ happen!” This course is based on the idea that programs, and the design of programs, is what makes the majority of our “typical” 1st world interactions possible. From food to transportation, a computer program was likely involved somewhere in the process of the product getting from production to the end user, regardless of whether the product is regarded as “technology”.

Next, we reviewed the question, “What’s the ‘Design Method’?” In this class, the design method is defined as a structure that takes you from a poorly defined problem all the way to a well-structured solution. To me, this transcends just software development, and can be used throughout one’s daily existence if applied in a thoughtful manner.

Lesson 2: Expressions

Dr. Racket is set up such that the Definitions Area is above the Interactions area, as you can see here:

In Dr. Racket, expressions are evaluated to produce values. In order to create an expression, one should utilize the following recipe:

For example, to have Dr. Racket compute “3+6”, you would input the following into its Definitions Area:

(+ 3 6)

Additional notes from this section:

; designates a line to be commented out

#i designates an inexact number

Lesson 3: Evaluation

The Rules in Dr. Racket to Evaluate Expressions are:

  1. An Expression is a “Primitive Call” when it begins as (*……

With * standing for any of the primitive Operators, including, but not limited to: +, -, /, *

  1. All the items after the Operator are designated as Operands
  2. The first step in Evaluation is to reduce all Operands to values
  3. Operands are reduced to values from left to right, and from inside to outside

Additional notes from this session:

Remember to include spaces before operands and numbers or else your expression won’t be able to be evaluated.

Lesson 4: Strings & Images

This lesson covered how to define strings and images, as well as some of their basic functions that the course will be using. Here are some of the highlights:

Strings

“This is a string in Dr. Racket”

Strings are considered values, and are not numbers, even if the string contains a number or numeric value.

(string-append “Ada” “Lovelace”) will evaluate to “AdaLovelace”

(string-length “apple”) will evaluate to 5

(substring “Caribou” 2 4) will evaluate to ri

Substring uses Zero Based Indexing, which in layman’s terms, means that it begins counting from 0. Thus, Caribou would be numbered C – 0, A- 1, R-2, I-3, B-4, O-5, U-6.

Substring takes the portion of the string beginning with the first operand, as well as the rest of the middle numbers, but does not include the closing operand.

Images

In order to utilize images in the Dr. Racket language, the top of the program must include the line (require 2ndp/image). This references the second edition of the How to Design Book’s image rules.

To Generate a Circle

To Generate a Rectangle

Text

Above

Beside


Stack

Lesson 5: Constant Definitions

The idea of defining a constant in Dr. Racket is similar, if not identical, to what I have experienced in other programming languages. Generically speaking, defining a constant means giving a name to a value (that has been hard coded) to be used in the future. Constants are usually defined in UPPER case, to differentiate them from other types of defined values.

To define a constant in Dr. Racket, one would use the expression:  A functional example of this would be: (define WIDTH 400). This would create a named value called WIDTH that would evaluate to the number 400 when used in an expression.

Additional Notes from this Section:

Defining a constant does NOT equal an output value.

Constants can be images. For example, (rotate 10 CONSTANT) will rotate a constant by 10 degrees.


Lesson 6: Function Definitions

Functions are the mechanism that lets you produce a different result each time you run a program, and they can be used repeatedly with any (valid) value. In my experience, similar to defining constants, this definition is true across many, if not all, programming languages. Across languages, a parameter is the changeable value that is passed into the function.

Using functions allows programmers to avoid the “cut and paste” trap that they may be inclined to fall into in order to review multiple values, and allows for cleaner, more concise code. 
To write a function in Dr. Racket, the following recipe is used:

Lesson 7: Boolean & If Expressions

Boolean values are expressions that evaluate to either true or false; this result is also known as a predicate. There’s no in-between for Booleans, and this is also true across the majority of programming languages.
If expressions rely on this predicate in order to branch its responses. If statements ask the program, “is this true? If so, do this. If not, do this!”. In Dr. Racket, an if statement is expressed as follows:

Lesson 8: Using the Stepper

Lesson 8 reviewed how to utilize a Dr. Racket tool called “The Stepper”. This program allows the developer to evaluate their program step by step, to determine where an error may lie. It’s a great tool for those using the class, but I don’t think it’s necessary to get into too much detail here.

Lesson 9: Discovering Primitives

What I found really interesting about lesson 9 was that its basic principles seemed counterintuitive to most other types of learning, but very indicative of how I feel about memorizing theorems and methods. As this class has its own “made up” programming language for us to use, no one is intimately familiar with the primitives (or anything, really!) we have available. The advice for this is twofold. First, we’re encouraged to “Take a Guess!” because the likelihood is that since programming is intuitive, we just might be right. The second suggestion is to “Search & Scroll”, which is explained as looking up a similar primitive and seeing what else related is available in our guidebook. As I said, I’m a huge fan of this approach, because it does not force the student to memorize countless hours of specifics, but rather allows them to dive right into the interactive work and learn along the way.

ALRIGHT

That’s it for the Week 1 Lessons. I think it was a really great start because I was able to refresh a lot of basic concepts, but also get a general feel for how Dr. Racket works. The homework assignments were pretty basic and I was able to get through them with relative ease. What I did get stuck on, for those of you who are following along as fellow course students, is that when putting in evaluation results, do NOT forget the “s surrounding your strings! I forgot this and I almost failed the homework quiz because of it. Luckily, our week 1 quiz allows a retake, so I was able to fix my mistake and I’m happy to say I scored 100%.

Developer Humor: A Developer's Greatest Wish

$
0
0

It's another Wednesday, so it's time to take another quick comic break in your busy week. This is one of my favorites, so I hope you enjoy it as much as we all do here at Infragistics!

Software Developer comics by Ignite UI: jQuery Grid

Viewing all 2374 articles
Browse latest View live