I doubt any of you may have used Indigo Studio as much as I have, but that can change. Here are my five usability sweeteners/addictions that make time spent building prototypes…sweet! Some are more obvious than others, but you will eventually run into them if you end up using Indigo like we do here at Infragistics. Think of these features as workflow accelerators.
#1 Alt+Click or Alt+Drag to add elements
This has become, by far, my favorite feature because it helps me hide away the toolbox, which leaves me with an uncluttered interface. As it's with any tool, once you have spent enough time working with it, you develop a certain workflow that keeps you efficient. Also, you develop a kind of affinity with some controls or design elements that you tend to use more than others.
Following are five design elements I keep reaching for:
- Containers
- Buttons
- Icons
- Text
- Repeaters! (learn more)
If you are wondering why not a "recently used" section in the toolbox, ALT+CLICK allows me to collapse the toolbox altogether! With this feature, I get a quick in-context search box into which I can type the control/element name, and place it exactly where I clicked. Gone are the days of locating something in the toolbox, dragging it out, and positioning it. To make it sweeter, if I ALT+DRAG, I get to add a control/element that matches my drag dimensions exactly.
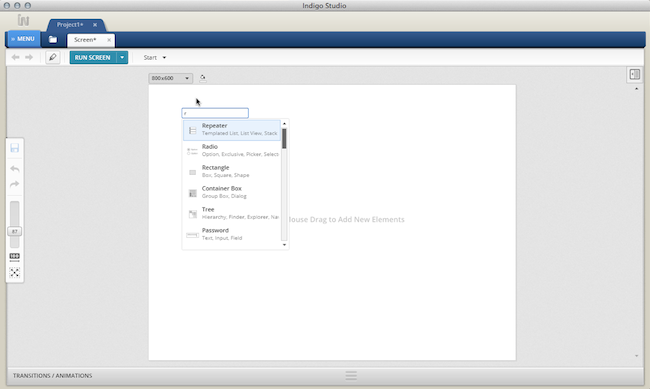
Fig1. Using ALT+CLICK shows an in-context search box for adding controls and elements
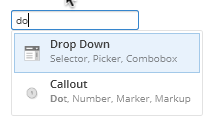
We did not stop there. An under-advertised feature of the ALT+CLICK search box is that you can type in a string of text and add this as a text/label element, provided it does not match on a toolbox item. But if for some reason it does match a toolbox item, you can force it to add it as a text label by typing an extra space. For instance, if you wanted to add text label called "DO" and it matches on "drop-DOwn," you can add it as a text label by typing SPACE and hitting ENTER. You may find this handy. I'm so addicted that I find myself doing Alt+Click on other tools like Omnigraffle and Powerpoint!
#2 What's Below the Cursor
This is another one of the features that I find useful for changing properties of design elements hiding behind a stack of elements; without having to re-arrange anything. You can invoke this by right-clicking on the design surface.
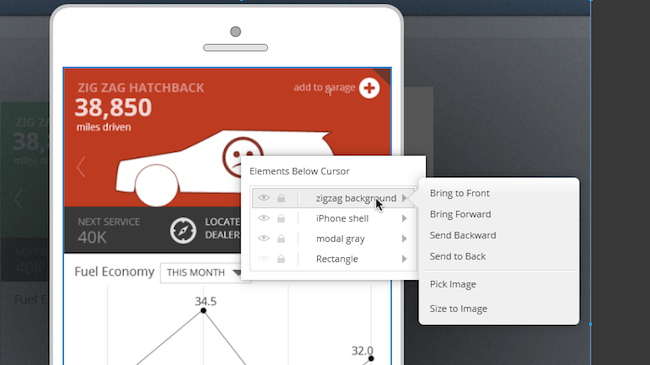
Fig 2. Right-Click to reveal "elements below cursor" context menu
In the list shown in the image, hovering over element names will highlight it on the design surface. As shown in the image, I am hovering on the background image called "zigzag background." Doing so also reveals a fly-out showing me z-order options and specific actions relevant to the image element. With this feature, I can pick a new image and replace the current one without nudging a single pixel. Left-clicking on the item in the list will reveal the contextual property panel for the image control, which will allow you to tweak any of the properties available for the image (e.g., add interaction).
#3 Hide Elements temporarily
The ability to hide elements on the design surface feels like an obvious thing to do till you realize that not many tools offer it. At least I haven't found it in tools like OmniGraffle or Powerpoint. If you know different, feel free to point it out to me in comments section of this blog article. I conceded that there are tools that let you show/hide layers and lock elements, but they don't let you temporarily hide the element.
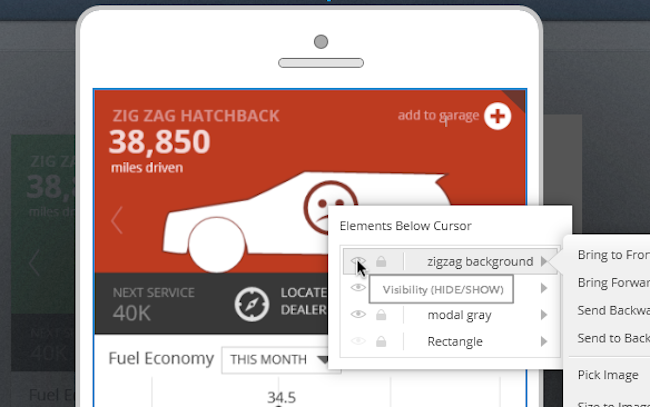
Fig 3. Use the "elements below cursor" to temporarily hide something
The HIDE functionality in Indigo Studio works differently than making design elements fully transparent. When fully transparent, you can still select it and move it around. In fact, I use this transparency feature quite often when I want to do a slick in-place appear kind of transition.
Using HIDE, however, it's as if the element never existed. What this let's you do is, as the feature suggests, HIDE unwanted elements till you need them again. You can hide elements both from the properties panel or the right-click menu. To show an element previously hidden, position your mouse cursor over where it originally was present and use the "What's below the cursor" feature. Or you can pull up the ELEMENTS and LAYERS panel located at the base of the toolbox and hide/show from there. The right-click option is quicker.
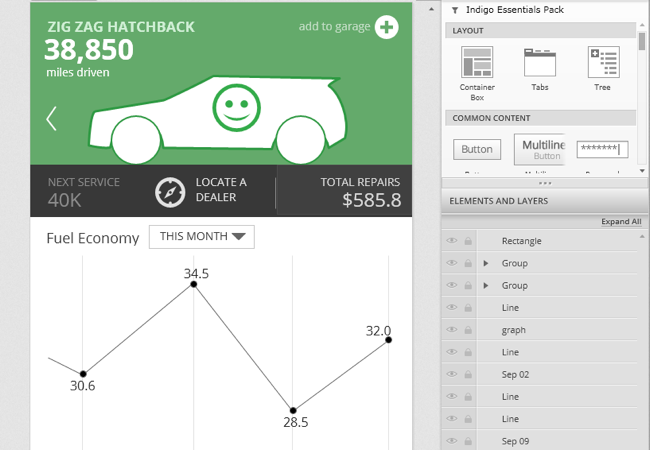
Fig 4. Showing elements and layers panel located at the base of the toolbox
In a nutshell, hiding elements directly releases you from worrying about showing or hiding layers, something you might use on other tools to control visibility.
#4 Edit/Move Interaction Flows
If you have already read our previous post on "Revisiting prototyping with Indigo Studio," you have some idea about how we approach interaction flows. For the uninitiated, Indigo studio places a spotlight on designing changes based on user interactions. To support this, Indigo not only offers the "traditional" screens, but also introduces screen states in a novel and useful manner. Each state/screen is connected to another via interactions, and when viewed together represents a flow. But sometimes, as part of design iteration, you will need to change how the user "flows" through the prototype. Editing or moving interaction flows via the interactions explorer will allows you to do that quickly
The following image shows an interaction flow for an e-commerce shopping cart experience.

Fig 5. A linear flow example for an e-commerce shopping cart experience
In this example, the user adds a couple of products to the shopping cart (marked in orange color) before proceeding to checkout. The user then wants to view product details for the "mac" product. To enable this, you design a DOUBLE-CLICK interaction on the "mac" product (in state #3), which reveals the product details (shown in state #4). The following list of actions/screens states will make it clearer if the image is not self-explanatory:
- User arrives at on the shopping page (start state), and clicks on add the "mac" product to shopping cart
- Shopping cart now shows one item, and the ADD TO CART option is replaced with the text ADDED, and colors changed to orange to indicate that it's in the cart; user then adds the "win" product to shopping cart
- Shopping cart shows two items. User then clicks on shopping cart
- Shopping cart is expanded to show contents; user DOUBLE-CLICKs "mac" product
- User views the ITEM DETAILS for "mac" product
The linear flow implies that DOUBLE-CLICK interaction is ONLY available from state #3 onwards, which is OK for a usability prototype. In fact, linear prototypes are good thing as we do not need to concern ourselves with what_if_the_user_clicks situation. The study moderator will take care of this. But what if you want a different flow to begin with? That is, the user wants to view the "mac" product details before adding it to cart. In this situation, you want the interaction (changes) you designed for ITEM DETAILS to be available earlier (in the start state).
One way would be to add an interaction in the start state, and target the interaction to an existing state (state #4). But a quicker approach would be to do the following:
- Expand the interactions explorer
- Select the state showing item details (state #4)
- Drag and drop this on top of the start state. That's all!

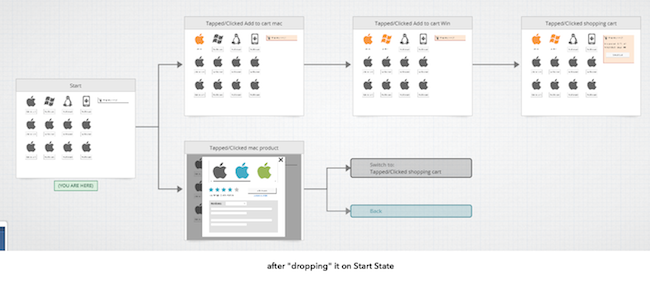
Fig 6. Showing how you can drag and drop states to edit the interaction, and edit the flow.
If you like, you can add an interaction on the ITEM DETAILS page such that clicking on ADD TO CART will take the user to an existing state where there is a one item added to the cart.
#5 Selectively Undo Changes (UNDO)
We are all familiar with what undoing the most recent action in an application implies. This is commonly achieved using the CNTRL+Z short cut key or some visible button to undo/redo an operation. Indigo Studio takes this a step further by letting you selectively undo some of your changes without forcing a sequential undo operation.
When you add an interaction on an element (e.g., button), and choose to create a new state, Indigo creates a copy of the previous state for you. At this point, the previous state and the current state are identical until you make some changes. As in, make design changes to the current state based on what you want the user to see. And any change you make is recorded in the timeline. Consider the following e-commerce flow once again:
- User arrives at on the shopping page (start state), and clicks on add the "mac" product to shopping cart
- Shopping cart now shows one item, and the ADD TO CART option is replaced with the text ADDED, and colors changed to orange to indicate that it's in the cart; user then adds the "win" product to shopping cart
- Shopping cart shows two items. User then clicks on shopping cart
In this example, six changes were recorded in the timeline that visually differentiate the START state from STATE #1 (one item added to cart).

Fig 7. Showing a list of changes made to the current state. Shopping cart is selected in the designer.
At this point, if you start undoing changes using the short cut key CNTRL+Z, Indigo will start undoing changes in a sequential manner, starting with the last change first. In this particular instance, UNDO will bring back the ADD TO CART button which was removed (most recent change). But what if you want to keep the last change but revert some earlier change made. For example, you want want to revert the color of the shopping cart from Orange back to Gray. With Indigo Studio timeline, simply select that change/action, SET COLOR and hit the delete key on your keyboard. That's it. You have now selectively reverted some of the changes.
Anyway, that's my list for now. Of course there are more, but that's for you to find ;).
About Indigo Studio
Version 1.x of Indigo Studio is free forever, and yours to keep. Check out some of the highlighted features here or download it now.
If you need help with Indigo Studio or prototyping in general, email us at indigo AT infragistics.com or follow us on twitter @indigodesigned.