This article is part 2 of two-part series. The purpose of this series is to compare and contrast Axure vs. Indigo Studio. In the process, help new users understand the prototyping approach in Indigo Studio, especially if they have used Axure in the past. This article is not a feature-by-feature comparison; it compares the prototyping approaches of the two tools by actually trying to build a prototype. After all, how else should one compare prototyping tools?
As discussed in Part 1,
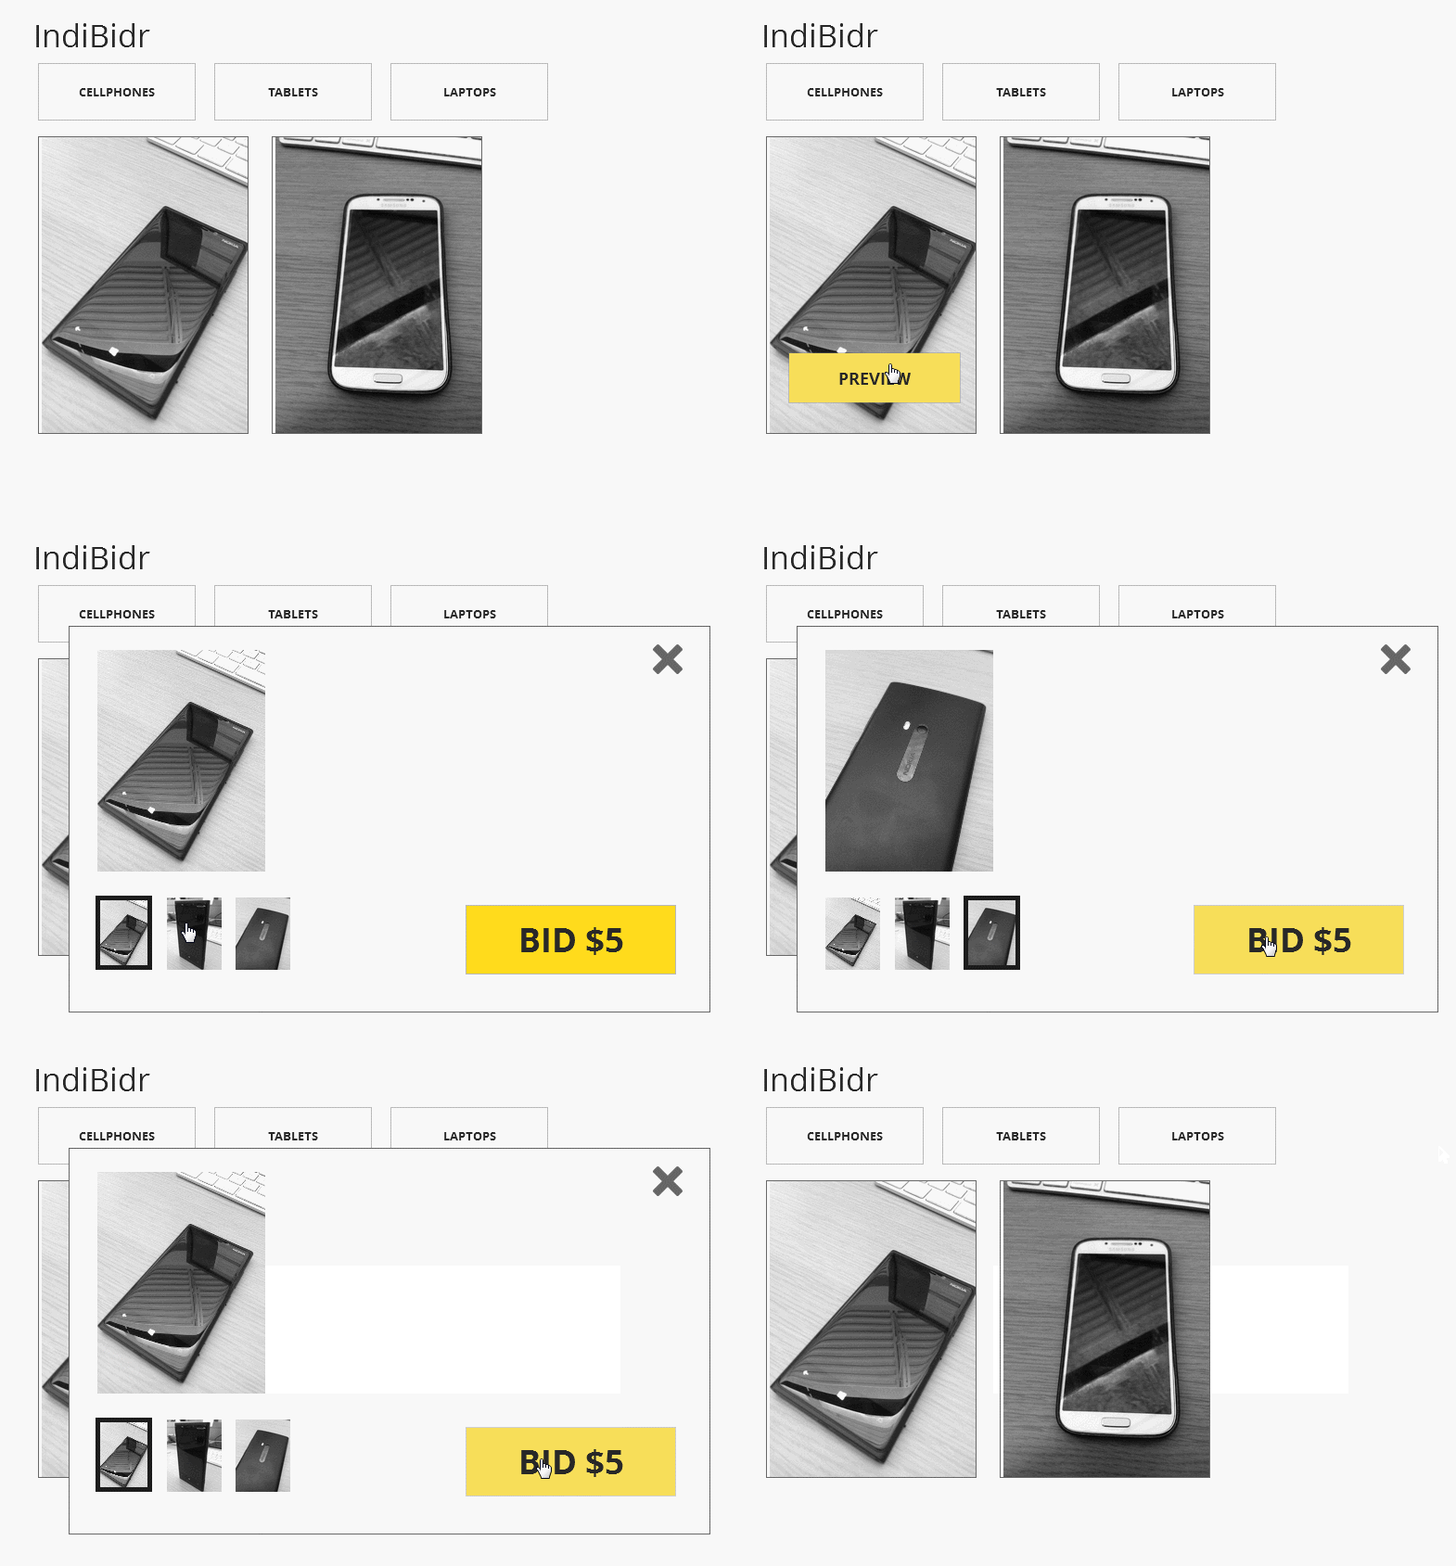
We created the exact same prototype using both tools to make it easier to compare the prototyping workflow. The prototype simulates a bidding website, where people can bid on products. Users can hover on a product shown and peek at the product details, which is shown as a pop-up. In this pop-up, users can view other product images and place a bid. Placing a bid shows a confirmation message and then users can close out the pop-up.Try the prototype here
In Part 1, we discussed:
- 1 Interactions Later (Axure) vs. Interactions First approach in Indigo Studio
- 2 Case Editor for UI changes (Axure) vs. Direct Manipulation in Context
In this article we discuss some additional differences:
- 3 Adding time-based changes via actions vs. Using a timeline for coordinating changes
- 4 Managing prototype using alternate views vs. Interaction Explorer for visualizing user flow
- 5 Widgets States vs. Screen States plus Widget states
3. Adding time-based changes via actions (Axure)vs. Coordinating Changes using a timeline (Indigo Studio)
Timing (transitions) can be an important dimension of interactive prototypes. Sometimes we need to show transient UI elements to serve as feedback to confirm user action. Animating the transitions can help fill the gap between two UI visual states (origin and destination state). For a deeper dive into the value of transitions, you can read this commentary on transitional interfaces.
In our example prototype for the bidding website, when the user bids on an item, we want to show a processing message, and after a 1s pause show a message stating the bid has been placed; this message goes away after a second.

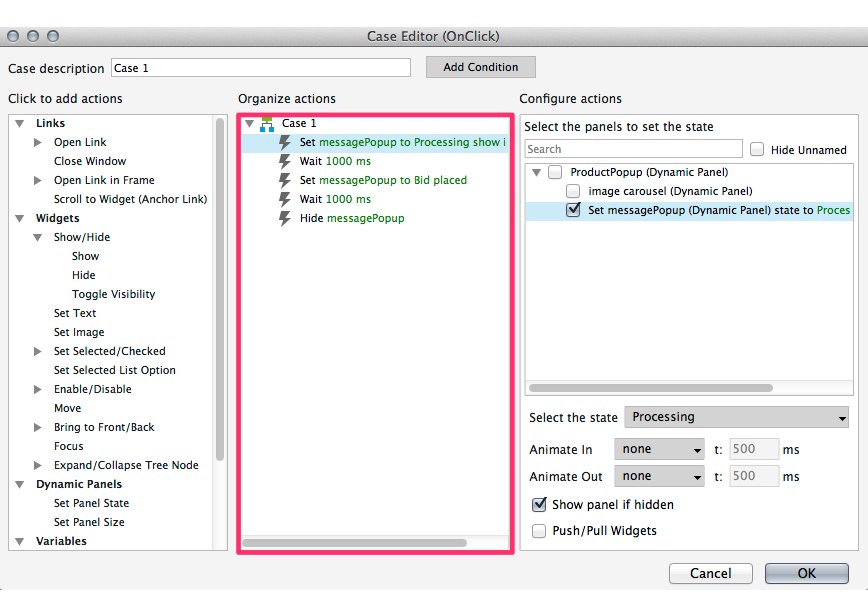
AXURE relies on the case editor and dynamic panel to simulate this piece of the user flow. The workflow is as follows:
- On productPopup panel, use a rectangle UI element and style it to serve as the processing message.
- Convert it to a
dynamic paneland name this messagePopup and set ashidden - Select and duplicate the state inside the newly created
dynamic panelusing thewidget manager, and name this new state bid placed. The first state can be named processing - Select the bid placed widget state and restyle UI elements inside it to say "bid placed"
- Go back to productPopup panel, and add click interaction on the BID $5 button.
- In the case editor, add a set of five behaviors:
ShowmessagePopup>waitfor 1s >set PanelmessagePopup to bid placed state >waitfor 1s >hidemessagePopup.
Watch video for displaying dynamic messages in Axure.
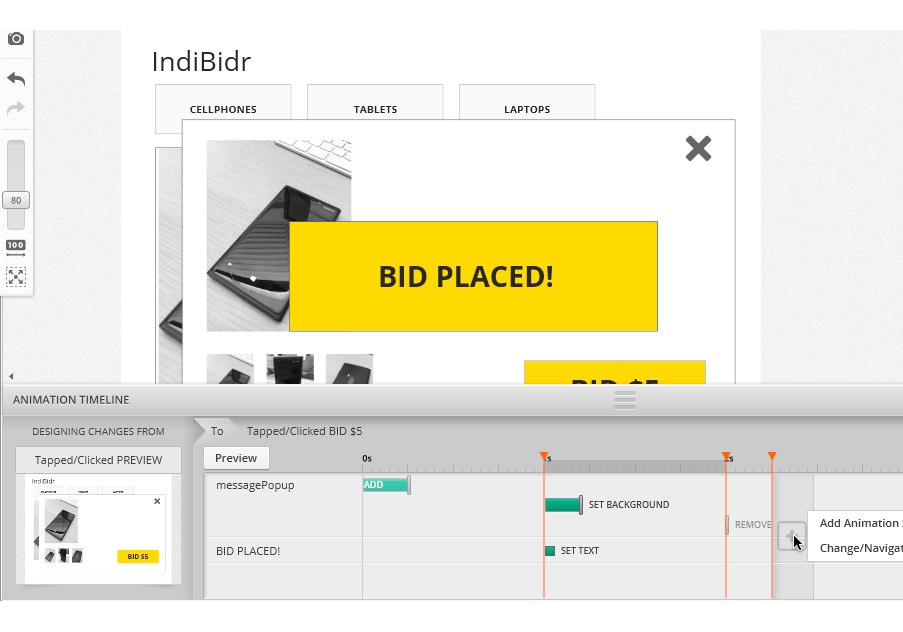
INDIGO STUDIO uses animation timeline and animation segments to achieve the same flow. When you create a new state based on the interaction, the timeline area records any visual change made to the new screen state. You then drag out these changes in the timeline to add duration to the transition, and arrange these changes to adjust timing. Animation segments help daisy chain UI changes. That is, each segment will auto-play without waiting for the users to interact.
The workflow is as follows:
- From the clicked Preview state, add a
clickinteraction on the bid $5 button to create anew state - In this new state, named clicked Bid $5, design the processing... message.
- Use the animation timeline area to create an
animation segmentand drag it out to 1s. - In this segment, change the processing message to say bid placed.
- Create a new animation segment, and drag it out to 2s
- In this segment, remove the bid placed message altogether.
Watch video for displaying dynamic messages in Indigo Studio.
4. Manage Prototype using alternate views (Axure) vs. Interaction Explorer for visualizing user flow (Indigo Studio)
Given that both Axure and Indigo Studio make use of states (widget vs. screen states), there is a need for managing states that are created.
As a designer, it's helpful to verify whether everything linked up the way it's supposed to work. Furthermore, when a designer other than you has to continue your work, they will need some way to make sense of how the prototype was created in order to make tweaks or extend the prototype. Tracing the interactions defined is a good starting point to explore the prototype. That is, based on the interaction what happens next, then what does the user do, then what happens on UI, and so on.
AXURE makes use of alternate views to represent the interaction. I am calling it alternate views because each view offers a piece of the user flow. Reviewing all the views together helps sum up the user flow being defined.
In Axure, once you add an interaction, say on the Bid $5, it places an adorner on the UI element indicating that an interaction is present. During design time (i.e., as you are designing the prototype), selecting the UI element with interaction populates the Widget interactions and notes panel. Here you can view what's supposed to happen when the user clicks on the button. Axure refers to a set of selected behaviors triggered by an interaction as a case. One can review these actions/behaviors by matching it up with the states in the Widget manager (if a dynamic panel is used).
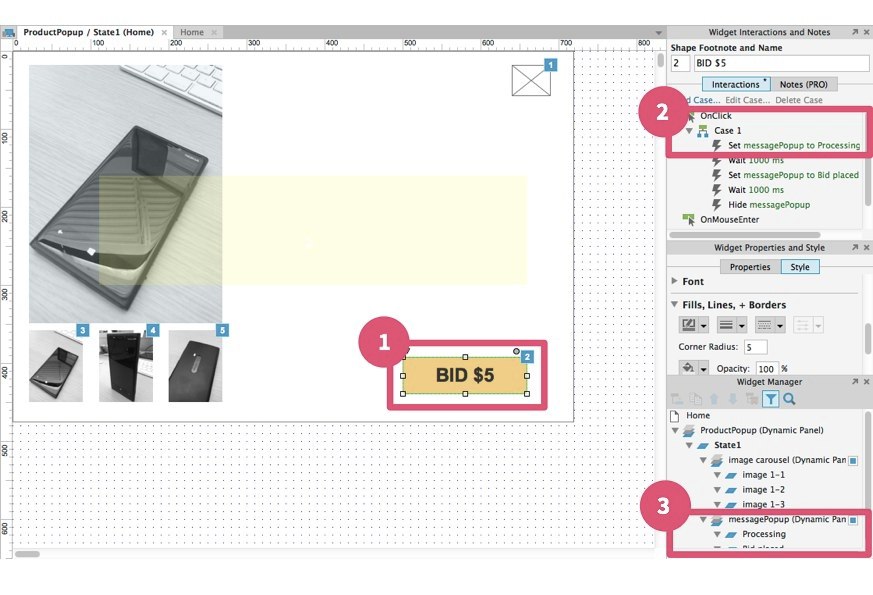
In our example prototype, you would sanity check the Axure prototype in the following way:
- Select the Bid $5 on the designer
- Review the
caseor set of behaviors defined. - Since the
dynamic panelcalled messagePopup is hidden by default, review the result of the interaction by inspecting the state in thewidget manager. - Run/preview the prototype to view the widget states in the context of the screen (showing widget state together with the screen).
In INDIGO STUDIO, the interaction flow is automatically graphed in the interactions (IX) explorer. Every time you add a new interaction, this graph is generated in the background to serve as a reference and as way to switch between states. Any UI state created as a result of adding an interaction is shown in the IX explorer.
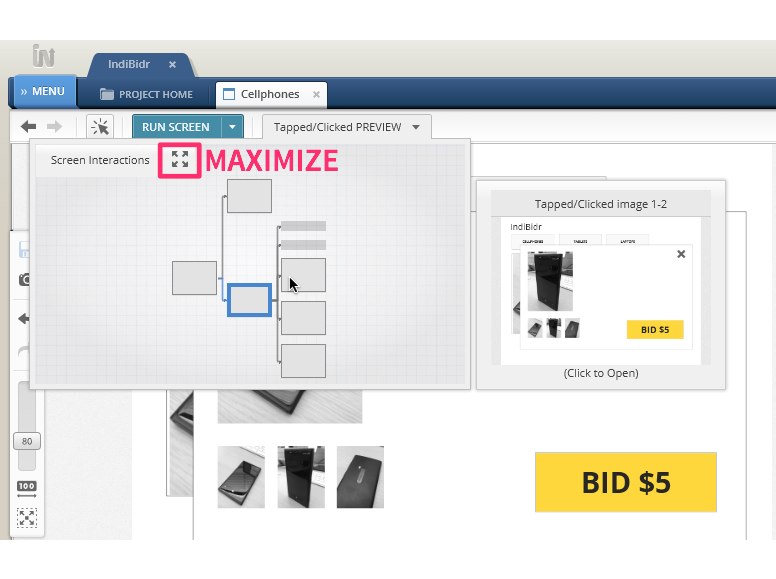
To view the states and interactions defined in the screen, users click on the state-name drop down. The drop-down initially reveals a mini view of the user flow. You can hover to get a state preview or click to go to that state.
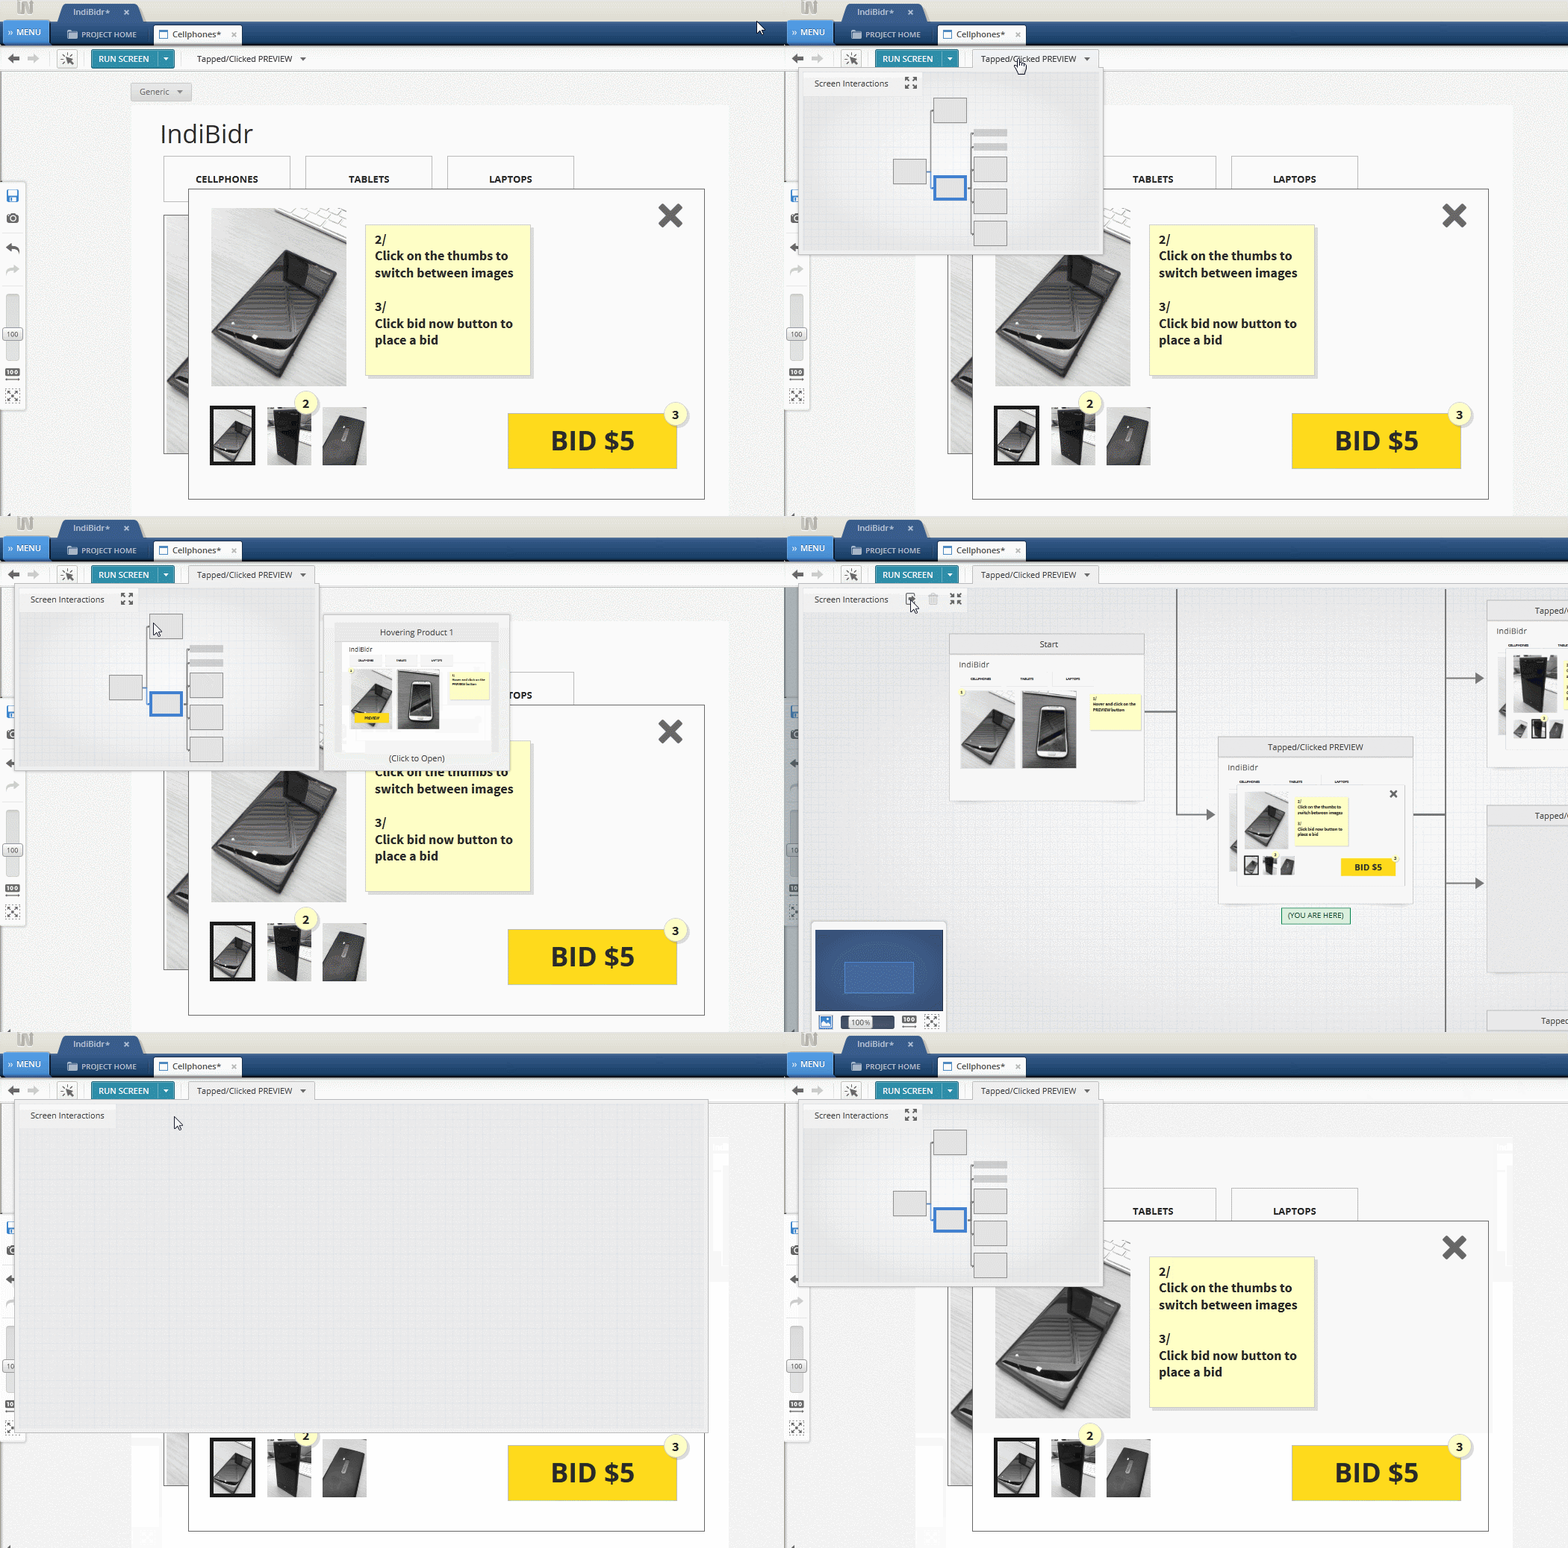
With the IX explorer maximized, you can view the user flow defined on the screen. The thumbs represent the screen states, and the arrow represents the interaction. The flow is read left to right. As we discussed earlier, each state name is a combination of the interaction defined and the element on which it was defined. The idea behind this naming convention is to communicate what lead up to this states.
5. Only widget-States (Axure) vs. Screen-States (plus widget states in Indigo Studio)
In a prototyping tool that allows UI-states, you could think of it a single-page app where the user is never leaving the screen/page. Instead, based on the interactions new content or a change is shown on demand, or based on interactions.
Consider a situation where something is shown as a pop-up or a modal overlay. Here the user has not navigated away from the screen; the screen is still in the background, but the pop-up is being shown on top of the content you were viewing. This approach is more inline with the dynamic nature of applications, which is different from say websites, where the interaction serve as pointers to different static screens/pages (e.g., home page, about us page). Don't get me wrong...one can still simulate these with separate screens. However, if you have to make any UI change or tweak to the original screen context, you will have to refactor multiple screens. (And yes, I have heard of masters to solve this issue of refactoring, but's that a topic for another day).
In AXURE, widget is a generic name for a UI element or a collection of elements, which you have converted to a dynamic panel. Widgets can contain a set of UI changes, which can be chunked into widget states or states of the dynamic panel.
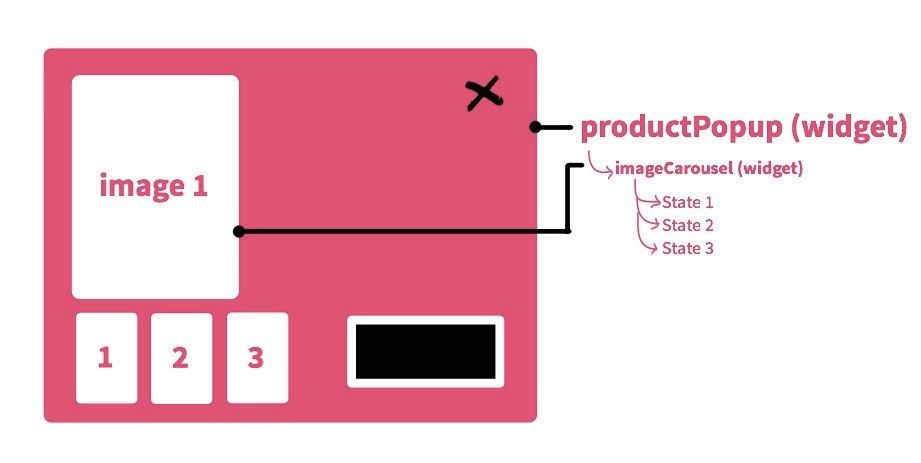
Dynamic content is usually triggered with an interaction, which would set the widget into any one of contained states. Dynamic panels can also be nested. In the example we are using, there is a Dynamic panel nested inside of productPopup and named imageCarousel. This nested widget has three states, each state showing a different image. Interactions are then defined on each of the thumbnail images (1,2, and 3) to set the bigger image to required state of the imageCarousel to match the image thumb clicked on. The UI change is restricted within the widget boundary.
Watch video clip for defining image carousel interaction in Axure.
INDIGO STUDIO, by default, makes use of screen/page states. The difference is that you are editing the state of the screen as opposed to the widget (e.g., imageCarousel). Editing nested elements are no different than designing the screen itself. This allows you edit any UI elements on each screen simultaneously, and the changes are applied on top of the original screen context. Which also means that you can refer the screen context as you are making changes to the nested elements.
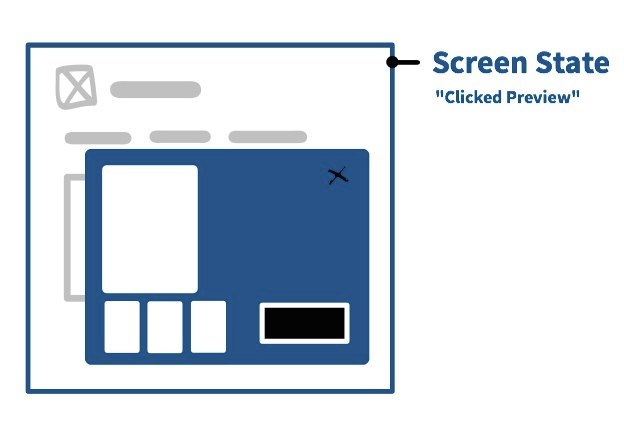
Of course, widget-state like behavior is also possible using screenparts.
To change the bigger product image based on the thumb selected, we'd use the interactions-first approach described earlier. Select the thumb1 and add an interaction to create a new screen state. In this screen state, switch out the bigger image. So the same for the remaining thumbs. When you do this, the resulting state is auto-named Clicked Thumb 1. In this state you can not only switch out the bigger image, but also edit/add any UI element on the screen state.
Watch video clip for defining image carousel like interaction in Indigo Studio.
Summary
In this article, we reviewed how Indigo approaches adding transitions, managing screen states, and introduced the subtle difference between widget states and screen states. We compared it to how Axure approaches these facets of prototyping. Read part 1 of this two-part series to view "interactions-first" and "Direct manipulation in Context" approach in Indigo Studio.
The complete video tutorial for each tool, and project files are available in the links shown below.
- Watch Prototyping with Axure | Download Axure Project
- Watch Prototyping with Indigo Studio | Download Indigo Studio Project
Note If you notice inaccuracies, please let me know so that I can correct them. Some of the steps may have been omitted in the interest of time.
About Indigo Studio for Interaction Prototyping
Don't have Indigo Studio? Download a free 30-day trial which will let you try all of the prototyping goodness.
Looking to suggest improvements and new ideas for Indigo Studio?
If for some reason you are having trouble with Indigo Studio, check out our help topics, forums or contact support.
Follow us on Twitter @indigodesigned


