 Creating an application is not only about making it functional it is about how the users will react to it. Did you know that when you create a mobile app for example a user decides in the first 10 seconds whether he likes it or not? So imagine how will you feel if the application is slow and you have to wait these seconds only for it to render? For us in Infragistics the User Experience is a top priority, that is why in the new 14.1 release we went through some major changes in order to optimize the UX of our users.
First we deprecated the rowTemplate option of the igGrid and thus we increased the templated igGrid rendering with more than 40%. And second we removed the dependence between the template and the syntaxes of the Infragistics Template Engine. The second alteration was driven by our desire users to feel free to use any Template Engine they like. In this blog we are going to go through some of the most popular template engines and see how to use them with the Infragistics Ignite UI controls.
What’s New in 14.1 Template Engine
A major changes in the new 14.1 release is that the rowTemplate option has been deprecated. This is a breaking change from the previous versions’ functionality. The igGrid control now uses only the templates for individual columns. As before you can use templates only for some of them (will be rendered through the template engine) and the other columns will render along with the grid render. This actually increases the render of the grid with more than 40% and thus with this alteration we did not only make the control faster but we also optimized the user experience when interacting with it.
Let’s see the grid in action. For the demo I’m going to use the Infragistics Template Engine. For some of the columns I‘m going to use different templates and the other I will leave unattached with template. Setting the template option separately to every column is very handy because it gives you the opportunity to manipulate them differently. You can check out the demo in jsFiddle to see it for yourself.
Condition Template:
- <scriptid="colTmpl"type="text/template">
- {{if${SoldLastMonth}<=${SoldThisMonth} }}
- <imgwidth='10'height='15'src='http://igniteui.com/images/samples/templating-engine/colTemplateWithConditionalCell/arrowUp.gif'/>
- {{else}}
- <imgwidth='10'height='15'src='http://igniteui.com/images/samples/templating-engine/colTemplateWithConditionalCell/arrowDown.gif'/>
- {{/if}}
- </script>
Grid Initialization:
- $("#grid1").igGrid({
- primaryKey: "ProductID",
- width: '700px',
- height: '600px',
- rowVirtualization: true,
- virtualizationMode: "fixed",
- avgRowHeight: "60",
- autoGenerateColumns: false,
- columns: [
- { headerText: "Product ID", key: "ProductID", dataType: "number" },
- { headerText: "Units in Stock", key: "UnitsInStock", dataType: "number", template: "Units in Stock: ${UnitsInStock}" },
- { headerText: "Product Description", key: "ProductDescription", dataType: "string" },
- { headerText: "Unit Price", key: "UnitPrice", dataType: "string", template: "Unit Price: ${UnitPrice}" },
- { headerText: "Sold last month", key: "SoldLastMonth", dataType: "number", template: "Sold last month: ${SoldLastMonth}" },
- { headerText: "Sold this month", key: "SoldThisMonth", dataType: "number", template: "Sold this month: ${SoldThisMonth}" + $("#colTmpl").html() }
- ],
- tabIndex: 1,
- dataSource: namedData
- });
Another change is that the template is no longer tied to the Infragistics Template Engine syntax which gives you the opportunity to use any other template system and override the template. Further in the blog I am going to show you how to do that in details.
Fire up Ignite UI controls with different template engines
The increased use of JavaScript led to the development of many JS libraries to support the applications developed in this language. When it comes to client side data-binding method it is convenient to use one of those templating libraries. As you know Infragistics has a great Templating Engine and you can easily use it to create templates and use them with the Ignite UI controls. But in case that is not enough for you and you want to use another Framework that is not a problem anymore - you just have to override the template. We are going to look at some of the most popular template engines and see how to do that and fire up some of the Ignite UI controls with the different frameworks. By overriding the Ignite UI template function you can easily use different template engines. The main idea is that every control that has a template option goes through the template function. This function takes two arguments – template as string and the data object to be rendered (called automatically by the controls) and should return the final result as HTML string.
HandleBars.js and Mustache.js
Mustache for example is often considered as a base for the JavaScript templating. This template system is described as a “logic-less” system because it lacks any explicit control flow statements. On top of it is build the HandleBars template engine. This is one of the most popular templating library and it adds a lot of helpers to Mustache. The syntaxes of these two templates is similar - they both use double curly braces.
If you choose to use HandleBars.js to render a template you should first create the template and then you can compile it by using the Handlebars.compile function. To get the HTML result of the evaluated template you have to execute the template with the data that you want to use.
- $.ig.tmpl = function (tmpl, data) {
- var template = Handlebars.compile(tmpl);
- return template(data);
- };
- $("#grid1").igGrid({
- primaryKey: "ProductID",
- width: '700px',
- height: '600px',
- rowVirtualization: true,
- virtualizationMode: "fixed",
- avgRowHeight: "60",
- autoGenerateColumns: false,
- columns: [
- { headerText: "Product ID", key: "ProductID", dataType: "number", template: "PID: {{ProductID}}" },
- { headerText: "Units in Stock", key: "UnitsInStock", dataType: "number", template: "In stock: {{UnitsInStock}}" },
- { headerText: "Product Description", key: "ProductDescription", dataType: "string", template: "Desc: {{ProductDescription}}" },
- { headerText: "DateAdded", key: "DateAdded", dataType: "date", hidden: true, template: "Date: {{DateAdded}}" },
- { headerText: "Unit Price", key: "UnitPrice", dataType: "string", template: "unitprice: {{UnitPrice}}" }
- ],
- tabIndex: 1,
- dataSource: namedData
- });
The template for Mustache.js is the same as the one we use with HandleBars because they have similar syntax. The difference appears in the override function – you have to use the Mustache.render to compile the template.
- $.ig.tmpl = function (tmpl, data) {
- var template = Mustache.render(tmpl, data);
- return template;
- };

On jsFiddle can check out a demo using the igGrid with HandleBars Template Engine .
Underscore.js
The Underscore is a JavaScript library that provides functional helpers without extending any built-in objects. As any template Underscore has its specific syntax so you can either use this syntax when you call the template or you can change the Underscore’s template settings to use different symbols. This can be accomplished by defining a regex to match the expression that should be evaluated.
Using Underscore syntax:
- $.ig.tmpl = function (tmpl, data) {
- var template = _.template(tmpl);
- return template(data);
- };
- $("#grid1").igGrid({
- primaryKey: "ProductID",
- width: '700px',
- height: '600px',
- rowVirtualization: true,
- virtualizationMode: "fixed",
- avgRowHeight: "60",
- autoGenerateColumns: false,
- columns: [
- { headerText: "Product ID", key: "ProductID", dataType: "number", template: "PID: <%- ProductID %>" },
- { headerText: "Units in Stock", key: "UnitsInStock", dataType: "number", template: "In stock: <%- UnitsInStock %>" },
- { headerText: "Product Description", key: "ProductDescription", dataType: "string", template: "Desc: <%- ProductDescription %>" },
- { headerText: "DateAdded", key: "DateAdded", dataType: "date", hidden: true, template: "Date: <%- DateAdded %>" },
- { headerText: "Unit Price", key: "UnitPrice", dataType: "string", template: "unitprice: <%- UnitPrice %>" }
- ],
- tabIndex: 1,
- dataSource: namedData
- });
- });
Changed Underscore template setting to perform HandleBars.js style template:
- $.ig.tmpl = function (tmpl, data) {
- _.templateSettings = {
- interpolate: /\{\{(.+?)\}\}/g
- };
- var template = _.template(tmpl);
- return template(data);
- };
- $("#grid1").igGrid({
- primaryKey: "ProductID",
- width: '700px',
- height: '600px',
- rowVirtualization: true,
- virtualizationMode: "fixed",
- avgRowHeight: "60",
- autoGenerateColumns: false,
- columns: [
- { headerText: "Product ID", key: "ProductID", dataType: "number", template: "PID: {{ProductID}}" },
- { headerText: "Units in Stock", key: "UnitsInStock", dataType: "number", template: "In stock: {{UnitsInStock}}" },
- { headerText: "Product Description", key: "ProductDescription", dataType: "string", template: "Desc: {{ProductDescription}}" },
- { headerText: "DateAdded", key: "DateAdded", dataType: "date", hidden: true, template: "Date: {{DateAdded}}" },
- { headerText: "Unit Price", key: "UnitPrice", dataType: "string", template: "unitprice: {{UnitPrice}}" }
- ],
- tabIndex: 1,
- dataSource: namedData
- });
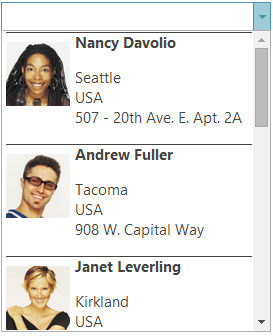
On jsFiddle you can see how to use igCombo with Underscore.

jsRender
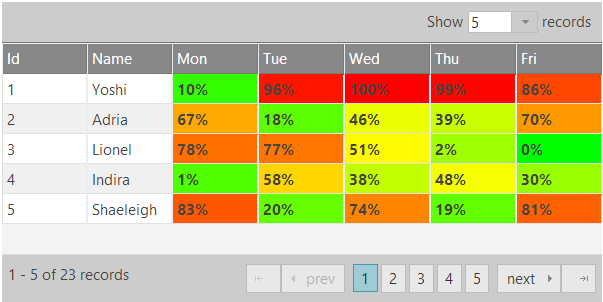
I have already written a blog about the jsRender integration with the igGrid, but that was about the 13.2 release. Now after the deprecation of the rowTemplate let’s go back and see how to change the Heat map sample. It is actually pretty simple all you need to do is set different templates to the columns that you want to participate in the establishment of the heat map. You can check out a demo of the sample in jsFiddle.
- $("#grid").igGrid({
- width: "600px",
- height: "500px",
- dataSource: busy,
- columns: [
- { headerText: "Id", key: "ID" },
- { headerText: "Name", key: "Name" },
- { headerText: "Mon", key: "Mon", template: "<td style='background: {{:~colorChange(Mon)}};'><b>{{>Mon}}%</b></td>" },
- { headerText: "Tue", key: "Tue", template: "<td style='background: {{:~colorChange(Tue)}};'><b>{{>Tue}}%</b></td>" },
- { headerText: "Wed", key: "Wed", template: "<td style='background: {{:~colorChange(Wed)}};'><b>{{>Wed}}%</b></td>" },
- { headerText: "Thu", key: "Thu", template: "<td style='background: {{:~colorChange(Thu)}};'><b>{{>Thu}}%</b></td>" },
- { headerText: "Fri", key: "Fri", template: "<td style='background: {{:~colorChange(Fri)}};'><b>{{>Fri}}%</b></td>" }
- ],
- templatingEngine: "jsrender"
- });

By following the above shown examples you can use any template engine you like and override the template in a similar way.
Summary
Every web developer has his preferences when it comes to using a JS libraries to help you create stunning applications. And what is better than being able to use them along with Ignite UI controls. With the latest release of our Web widgets we give you the opportunity to blend your favorite template engine with our controls by overriding the template function. Our desire was to make you feel comfortable and thus create your apps faster and easier.
You can follow us on Twitter @Infragistics and stay in touch on Facebook, Google+ and LinkedIn!
