A lot of people are coming to Android development from a Windows Silverlight or WPF background, and whilst there are quite a few “getting started with Android Development” blogs, tutorials and even websites to be found all over the internet, there’s almost no help for the crucial step zero of getting started – setting up the development environment.
Android applications are (for the most part) developed in Java. In principle, this gives you a lot of freedom for your choice of development, debugging and test environment. In practice though, you’re going to be using the Eclipse IDE along with the android specific plugins, SDKs, toolkits, debuggers, emulators and drivers.
Getting all of this running really isn’t all that complicated but for the uninitiated, the jargon and interdependencies can be a little confusing, so I’m going to go through the whole thing one step at a time.
The IDE
Eclipse is the free, open source IDE for Java in general and Android development specifically. You don’t have to use it, but if you’ve got any sense you will.
First of all, we’re going to get Eclipse up and running. Since Eclipse is itself a java program, it requires the JRE (that’s Java Runtime Environment) to run. You’ve probably already got a JRE on your machine already, but since you’re going to be developing Java programs you should install the JDK instead (that’s Java Development Kit which includes the JRE as well as the source code for the standard Java libraries). You can download the JDK direct from Oracle here. After clicking the download link, you need to accept the license agreement and then choose your platform. Once downloaded, the JDK has an installer. The only the configuration option is the installation directory and, as usual, it’s best to accept the default. At the end of the installation a browser window might open to allow you to register but that’s, well, let’s say it’s “optional”.
Now that you’ve got the most recent JDK you can go ahead and download and install Eclipse. Visual Studio users might be a bit confused by all the different download possibilities – A good choice is the Eclipse for Mobile Developers version. Eclipse installation is as simple as “unzip the download file to c:\Program Files and create a shortcut to the the Eclipse executable c:\Program Files\eclipse\eclipse.exe”.
At this point, you should be able to actually run eclipse (For some reason, the first time I run eclipse I get a warning about the publisher not being verifiable) and write some general purpose Java programs. What we really want though is to write Android programs. So let’s start configuring.
The Core Android SDK Tools
The SDK Tools package is not the complete SDK environment. It includes only the core SDK tools, which you can use to download the rest of the SDK packages (such as the latest system image).
Download the Android SDK Tools installer here. You’ll need to agree with the Android SDK license agreement before clicking through to the download itself. The only configuration option is the SDK installation directory. The best choice is the default value, but whatever you choose keep a note of it, as you’ll need it later.
The installation will look for the java installation; if it can’t find it, you’ll just have to set the JAVA_HOME environment variable.
Once the installation completes, the installer offers to start the Android SDK Manager. Decline this offer as we’ve got to install the android ADT Plugin first.
The ADT Plugin
The plug in extends eclipse by adding new android specific project types, debugging environment, editors and installers. In principle, it’s possible to work without the Eclipse ADT (that’s Android Development Tools) plugin. It’s called an Integrated development environment for a good reason though, so you’re going to download and install it.
Eclipse has a built-in system for adding and maintaining plug-ins
- Start Eclipse, then select Help> Install New Software.
- Click Add, in the top-right corner.
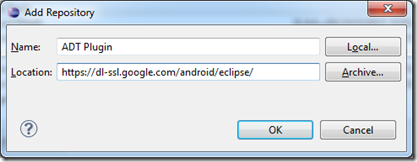
- In the Add Repository dialog that appears, enter "ADT Plugin" for the Name and the following URL for the Location: https://dl-ssl.google.com/android/eclipse/
![image image]()
- In the Available Software dialog, select the checkbox next to Developer Tools and click Next.
- In the next window, you'll see a list of the tools to be downloaded. Click Next.
- Read and accept the license agreements, then click Finish.
- When the installation completes, restart Eclipse.
Once Eclipse restarts, you must specify the location of your Android SDK directory:
- In the "Welcome to Android Development" window that appears, select Use existing SDKs.
- Browse and select the location of the Android SDK directory you recently downloaded and unpacked.
- Click Next.
Your Eclipse IDE is now set up to develop Android apps, but you need to add the latest SDK platform tools and an Android platform to your environment. Nearly done.

